Showing posts with label 3-D. Show all posts

Tuesday, February 7, 2023

Bookmarks!

At church this year, I teach the children who are reaching the age when they can choose to be baptized. My teaching partner and I were trying to think of a simple gift we could give to recognize them, but not be a huge commitment through the year. And then I saw this new stamp set that I think is gorgeous, and it was a perfect match! 
About 17 years ago I bought a pack of bookmarks that Stampin' Up! carried at the time. I have been packing them around all this time and I knew that would make a perfect gift....but now they are lost somewhere in my craft room... So I ended up having to make my own, lol. It worked out tho, and here are the first round I have made. 
Supplies:
Stamps: Rejoice In Him
Ink: Memento Black
Paper: Basic White, Soft Seafoam, Petal Pink, Balmy Blue, So Saffron
Accessories: 1/8" hand punch
1. Stampin' Blends: Dark Petal Pink, Bronze; Seaside ribbon original, White Grosgrain ribbon
2. Stampin' Blends: Light Petal Pink; Sweet Sorbet Accessories Twine, White Grosgrain ribbon, Copper cord
3. Stampin' Blends: Light & Dark Balmy Blue, Ivory; 1/8 Silver ribbon, White Grosgrain ribbon 
4. Stampin' Blends: Ivory, Light Daffodil Delight, Light Smoky Slate; 1/8 Daffodil Delight ribbon, White Grosgrain, Crushed Curry twine

To do a decorative top, I used one of the scalloped Circle Dies, but only ran it thru the machine half way. Don't go too far- I had to cut another one after the first try. 
And then to top them off, I just used an assortment of retired ribbons, two or three each. I have a lot... 
Then I wrote a little note on the back and that was that! 

Wednesday, November 11, 2020

Wedding Crafting!

My little sister just got married and I made the card box for the gift table. She saw an idea in a store, but didn't want to spend $40+ on something she was going to use once for a couple of hours, so I was asked to make something similar. 

I found a box, took off the shipping labels I could remove, taped it shut, and cut the hole out to put the cards into. I painted it all white with acrylic paint. Then I bought a roll of burlap and stewed about how to get it on the box and make it stay and laid it out and talked to friends... one suggested staples might hold it on without making a mess? It totally worked and it worked great except for the top where the hole was- it wasn't sturdy enough to take the staples, but it worked well enough everywhere else that it ended up okay. There is no burlap or paint on the bottom, that way my sister could just cut that end open to get to the cards inside. 


The better looking side of burlap got to be the front, haha. I decorated it using a lot of retired stash! 
First the strip of White Jute ribbon, then a strip of Old Olive Mini Chevron Ribbon. And finally I made the "medallion" part. That is a Pearlized Doily, backed with a little more jute ribbon, and topped with a twist of the Olive Chevron, then a bow made from Silver 1/8" Ribbon, and finally a wooden "love" which came from a Paper Pumpkin kit! They're all held together with glue dots and sticky strip and it held up! 
...until the crazy wind started throwing everything around and the rain was pounding, haha..... But it looked pretty anyway! 
~~~
I also put together a bunch of activities to keep the kiddos occupied. Just in nieces and nephews alone, we're at 8 kids between 2-11, and we didn't know how many others were coming. I needed quiet activities that were also clean...hmmm..... I happened to remember my long-retired Bingo Board background stamp, so I put my daughter to work searching current and retired stamps for small images that worked for an autumn wedding...and maybe honeymoon, even tho the happy couple isn't going on a trip any time soon.
~~~
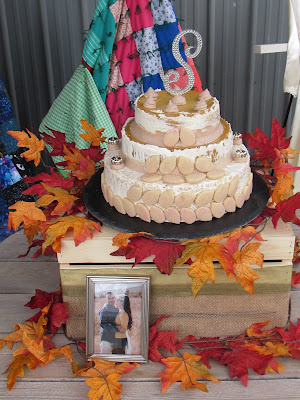
And finally, my husband was in charge of the wedding cake! He actually completely volunteered and was given free reign, so here's his "first, and likely only" wedding cake-
That is a rice krispies base, and two layers of pumpkin cheesecake. The leaves are a marzipan shortbread cookie and after they were baked they were painted with a cranberry/powdered sugar glaze. Finally it is frosted with a white chocolate buttercream for a "naked" cake look, and then dollops of maple cinnamon white chocolate buttercream to hold the tiny pumpkins and cookies on! 
Weddings are a TON of work, even if you live two hours away and aren't the couple or their parents! Sheesh! hahaha! 

Sunday, October 1, 2017

Blog Hop: Paper Pumpkin Stepped Up!

Happy October 1st to you! A new month always means a new blog hop around here!
You may have noticed there was not a lot of stamping in September. Hardly any. None...? I did three posts and two weren't my own work and the first was done in August! Yikes! Don't get me wrong, I was super busy with plenty of other things...but I have high hopes for more stamping to come very soon!
I haven't got to play with my last few Paper Pumpkin kits, and I thought that was a good place to start for this hop! This is the latest Paper Pumpkin kit, and the refill kit is available to subscribers HERE. (Refill kits don't include stamps or inks, just the papers and embellishments to create more of the kit)
First up, I made the projects as they're designed:
Eight mini cards like this.
And eight cute pillow boxes like this!
And here they are together.
I would like to point out they provide 18 total of each style of leaf, tho the colors do vary. The kit is designed for 16 projects but there are already supplies for extra! I love that!
And then, I used the latest Freshly Made sketch to design my own card with the same supplies! 
I used the different greeting (now you've seen all three) and the little leaf stamp(which I didn't use on the die cut leaves...) and added the exact leaf bundle from the pillow box above on this card. I turned the greeting tag the other way and that's really it! I also put it on a Crushed Curry base, rather than the Soft Suede. 

Sooo now that I look at it, maybe my card isn't stepped UP, but it is a different way of using the Paper Pumpkin kit! And you know what else? It took me exactly one hour to make all three cards, including looking for a sketch to utilize for my own card, and settling on the card stock base! That's not bad all!  

Anyway, continue on with our October blog hop by clicking the hand below and moving on to see what Cheryl created! And please leave us your thoughts- we all love comments! 
If you'd like to see the instructional video on this Paper Pumpkin kit, and a few more ideas, check this post out HERE.
There are so many ways to use these fun kits and I really hope to get them pulled out and used up soon! You can always sign up to get the monthly kit sent straight to your door every month! I definitely enjoy the cute projects! Just click the Pumpkin icon on my sidebar if you'd like to sign up with me as your demonstrator! It's that easy!

Monday, February 13, 2017

Paper Pumpkin Valentines!

January's Paper Pumpkin kit was a cute treat bag, perfectly designed for Valentines (but perfectly usable for any occasion!). In organizing the house, I had pulled out all of my Paper Pumpkin boxes once more, and realized I had a few options for my daughter's last year in grade school- which is the last year they exchange valentines with classmates. I showed her the options and she loved the newest kit, and that gave me pictures for a blog post! haha...

One of the nights she did the stamping and assembled the arrows...

 another night she put together the bags, added a few "Fave-Red Starbursts" to each, and was done!

Full disclosure: To make all 24, this kit definitely took more than 30 minutes. But unless you're doing it for a class, I don't know when you would need all 24 in one shot. For past treat kits I have put together a few at a time as needed.

Monday, November 7, 2016

Bridal shower!

One of the many things happening this fall in my world, is my brother's wedding! My mom and I hosted a bridal shower for his fiancĂ©e, with a recipe theme. 

To start, I made these cute invitations with my (sadly) long-retired MDS, and some cute kitchen and cooking themed stamps and DP. 
Then, I stamped index cards using another long-retired stamp set. Each invitation went out with an index card so that people could bring a recipe with them, or even mail back just a recipe if they were unable to attend. And that's exactly what some people did!
For the shower itself, I stamped more cards, so that people could leave "a recipe for a great date night" and/or a "recipe for a happy life together", but I didn't get any pictures of that...

I used a recent Paper Pumpkin kit to make a cute banner. It says "BRIDAL SHOWER"... and there are some photo posters....
And here's a close-up....
So that my kids could help (and stay busy?) they made this sign for the door. And the balloons are my husband's interpretation of my daughter's idea!
My son drew the bubble letters and my daughter colored them.
And the cute couple enjoying the shower, for good measure...!
So, you see, I haven't been completely non-creative.....just non-blogging. 

Thursday, November 3, 2016

Paper Pumpkin September

Hello again! While on my little break, I still created a few things. Today's post is another fast one, but since I snapped a picture before delivering these, I may as well share it!

September's paper Pumpkin had a cute little way to share a treat. As is always the case for me, treat packaging goes to some ladies in the neighborhood, or from church. Turns out, these tiny tubes hold one m'n'm per layer, and that was perfect. I used the autumn colored m'n'm's out of two regular packages, for reference. 

These would also make cute thank you gifts since we've now moved into November. And, the refill kit is still available for subscribers! Check it out HERE
Not a subscriber? It's easy to sign up! Click the Paper Pumpkin sign on my side bar! 

Monday, August 8, 2016

July 2016 Paper Pumpkin

Happy Monday, once again! I had some time to play with July's Paper Pumpkin (which I got late...darn moving! Don't do it!) and I thought I'd show you what I did!

Usually when we get treat pouches and or gift boxes, I use them for the ladies I visit thru church. This is especially handy since I just moved and I don't know the people I'm supposed to visit. Crafts and chocolate is a great ice-breaker! I made a few boxes up and put 3-4 Hersheys Nuggets inside. They all have the same stamp because it is the most 'everyday' option.
Then I tried to think of a card I could make, to use up the other supplies. The printed paper the boxes are made from is fun...I'm just out of a use for treat boxes! I ended up using THIS sketch as inspiration for the layout, and I only used one of the triangle panels from a box to make the pennants at the bottom. I added some Flirty Flamingo card stock for the base, and a little stamping, and there's a cute card! 
Have you gotten your July Paper Pumpkin? If so, what have you made with it? Who do you give treat boxes to?? Inquiring minds need to know!

Friday, February 12, 2016

Valentine's Prep!

I have created things, just not stampy things... until this morning, when I crammed all of my Valentine prep!
At our house, my husband and I put out very small Valentine gifts at everyone's spot at the table for them to wake up to. Its not really a big deal, but it is fun to see something special just for you!
~~~
I have one child still in elementary school, which means a class Valentine exchange. Tuesday I put the kids to work peeling wrappers off the broken crayons in our stash...and I chopped them all into smaller bits.
Then we stuffed this silicone heart mold full of crayon bits.
We learned to put them in standing up to get fuller hearts. We used THIS and THIS post via Pinterest to figure out how, but the gist is that I put the mold in the oven on 230* for 15 mins, let it cool on the counter about 7 minutes and then cool in the freezer about 10 mins. Then you pop them out and laugh at how different they look on the bottom than the top!
In between melting crayons, she wrote out her paper valentines to her classmates.

Thursday, she chose which crayon went to which person (just like her mother that way...) while I started hot gluing crayon hearts to the valentines.
 And once she had selected them all, she got to do the hot gluing!

Also Thursday when I was at the store I texted my husband- did he want me to pick up Valentine gifts for the kids?? Sometimes I get them, sometimes he gets them. As I browsed, I found reason after reason not to buy any of the things.....and then I remembered that my Paper Pumpkin kit -which I hadn't got to play with yet- was perfect for this!!!
So I picked up a few kinds of candy we like and this is how I spent my Friday morning!
The January Paper Pumpkin kit is these die cut paper hearts and banners, which can be embellished with stamps or sequins, and turned into either a conversation heart Valentine banner, or little gift pouches. I made them all different. It was so quick and easy!


Ready to go! 
And we'll set these out Saturday night, along with a card from my January class! How easy is that?!

If I did them all as treat pouches, there are still enough hearts to make 12 more! My Pinterest board also has idea for making them into cards! And I have ideas for scrapbooking and other fun ways to use the remaining embellishments and the stamps! I love Paper Pumpkin!

Wednesday, May 27, 2015

End of the Teacher Gifts!

I promise, haha! This is absolutely the most effort I've ever put into teacher gifts, and it is the most gifts I've done at once, so maybe that's why...I could never teach a classroom full of children, no matter the age, and I want these wonderful teachers to know they are appreciated!
Anyway, on with the stamping!

Last week I posted that I needed to use up my Paper Pumpkin kits and get those boxes out of my closet, haha... That day I had 13 boxes (because my newest kit arrived!) and now I have 7! Yeay!! I realized the note cards from the April 2015 kit were perfect for teachers! I always include a little thank you note from me, and this was just the right size- and great for both men and women! So here are the notes I made for them. The women got the little envelope that came in the kit, the men didn't, haha.... You can see more of that kit HERE and the refill is available to subscribers HERE.
Supplies: April 2015 Paper Pumpkin Kit

In case you wondered how it all turned out- the four women got the gift bags from the latest kit, (available to subscribers HERE) and they're super cute! Then, in that closet that had to be tackled, I found two little brown sacks that had "thank you" printed right on them! I have no idea where these came from but I needed sacks for two men and these could not be more perfect!
Supplies: May 2015 Paper Pumpkin Kit

One thank you gift was delivered this morning, four will be delivered this afternoon, and the last one goes out Friday morning!

Monday, May 25, 2015

May 2015 Paper Pumpkin!

Happy Memorial Day to you!

My latest Paper Pumpkin kit arrived last week, so I took a little time today to play with it! ALL of it! Remember, I don't want another box just taking up space...! haha!
To be honest, when I first saw the kit, I thought "meh...." I even considered giving it away - except that I liked the stamp set! Really, it was that I wasn't excited about making gift sacks, even cute ones. I just didn't wanna... Til I realized how handy and timely this was! Inspiration struck and I went to town!

First, this is how the kit is designed, with four gift sacks and six cards. Cute, happy and fun! And really easy too! Can't beat that!!
I keep gift sacks that we are given and I rarely buy them new, haha, so having four new (and quite small) gift sacks really just did not appeal to me.
However.
*grin
This is the last week of the school year and that means teacher thank you gifts!!! Yes, please!! And with a child in junior high, that means several teachers need a gift this year! Usually I just stamp brown paper lunch sacks, but now that I have this kit, the four female teachers are getting these sacks! Balloons and "celebrate" totally apply to the end of school! (yellow tissue paper will be added when I have the stuff to go inside them) And what do you think of my alteration?? Fun, huh?
 And just because I can, I mixed up the card design a bit too!
 (check out the inside detail! I almost never do that either! haha...)
I even kept aside a few supplies to put together a scrapbook page another day.
And there you have it- my May Paper Pumpkin kit! Almost completely used up in one shot, for a bunch of different projects! YEAY!

*Like I said, I have done gift sacks as teacher gifts most years. What goes inside? I let my kid choose a candy for each teacher, then I stick in a package of microwave popcorn and 3-5 stamped cards with envelopes, plus a handwritten thank you from my child and one from myself. I have my kids choose from my thank you stash, unless they want to stamp their own. And the gifted cards are also selected from my stash.

And don't forget this part:
Right now new Paper Pumpkin subscribers can skip to the fun for less! Get 50% off your first two months of Paper Pumpkin when you sign up by June 10. Go to PaperPumpkin.com and use promo code: SAVE50. 
After your first two months, keep the creativity coming for just $19.95 USD/$24.95 CAD + tax per month (shipping included). Each month a fully designed project kit will arrive at your door with stamps, ink, and paper—everything cut and ready to go. 
It’s commitment-free! You can suspend your membership at any time. So, go on, sign up for Paper Pumpkin. You’ll love it—we guarantee it!
(For new subscribers only, not valid on prepaid subscriptions. Discount applied to one kit per month for the first two months of a new subscription. Offer ends June 10, 2015 at 11:50 pm (MT).)
Sign up by clicking the Paper Pumpkin button on my sidebar, by June 10 with promo code SAVE50!

Monday, April 27, 2015

April's Paper Pumpkin!

Happy Monday to you! Quick post today...really busy one for me!

This month the kits are designed for Mother's and Father's day notecards. This is not really what I had in mind for my parents...maybe my siblings....Instead I used the other stamps to make different kinds of notecards. I do really like the color combo, and the font!
This is how they are meant to look when you deliver them...
I also thought the envelopy box thing would work for small gifts- cash, gift cards, or even Ghiradelli chocolates!! (but I didn't have those laying around...!) And that means it is a great kit for graduate gifts!

Related Posts Plugin for WordPress, Blogger...