Thursday, December 24, 2020

Merry Christmas!

Merry Christmas to each and every one of you! I have spent the month off the blogs and making memories in this weird year. I cannot wait to scrapbook and use the almost retired Christmas supplies I've ordered, haha...! But really. I've been tracking all the holiday things we've been doing so I can do a December Daily scrapbook. I love that because scrapping Christmas for three kids plus me is overwhelming. Or ya know, probably I just take way too many pictures.   

Anyway, here is our photo card this year, with a Christmas wish for YOU too. I made it with my long retired MDS program. Thank you for reading all year and for supporting my little business. I appreciate you! I hope your day is full of love, no matter the circumstances. 

Here is a new favorite Christmas video for you to enjoy. Or this link HERE.


Merry Christmas!

Wednesday, December 23, 2020

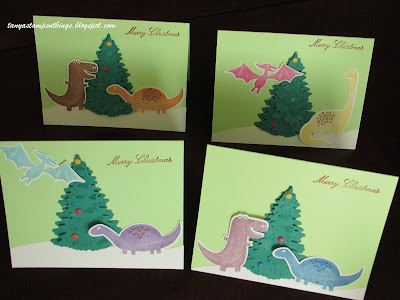
Dino Christmas!

This month looks like a bust for stamping, even tho it wasn't. Just a big bust for blogging!!!
I helped my mom make 42 cards one afternoon and the next morning. Here are four of the most clever ones, haha! 


Supplies:
Stamps: Dino Days, Come to Bethlehem (lonnng retired)
Ink: Cinnamon Cider, Pumpkin Pie, Melon Mambo, Daffodil Delight, Balmy Blue, Highland Heather, Pacific Point, Real Red...I know I've missed a couple...
Paper: Whisper White, Shaded Spruce, Gable Green (LONG retired)
Accessories: Dino Dies, In The Woods Dies, Big Shot (retired), Regals Candy Dots (retired)

And here are some close ups for you! 


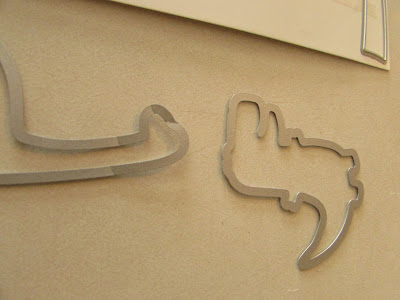
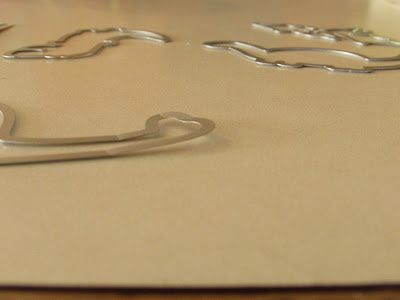
Also, a tip. Ahem. Please make sure your dies are OUT of the path of the machine or sandwich before you put the next one in. This one was hiding below the paper, and look what happened! 


And this is after I ran it through again, with no paper, trying to flatten it, since the dies are my mom's and I'm the one that bent it....! AHHH! 
So don't do that!! 

Monday, December 14, 2020

Still here...!

So today I was hoping to {finally} get my Christmas cards mailed out! We're doing a photo card this year, and a newsletter, altho a few lucky's get hand stamped cards too! And even fewer lucky's get a hand drawn or colored paper by my youngest! This is how many I got done before I ran out of envelopes! AHHH!!! Here's hoping the store has some when I venture out today!  

I hope you're all doing well out there, and that you are enjoying the holiday season! Mail some cards out! It makes you happier and it makes the person who receives it much happier too, knowing that you are thinking of them! 

Tuesday, December 1, 2020

We Create Bloggers: Happy Holidays!

Welcome to December! My next favorite month of the year! This month is my favorite holiday: Christmas! It is cold here, but most of the snow has melted, even from the mountains! But a new month means a new blog hop and we are ready to inspire you with holiday themed projects! 
My card today was a very quick one to put together- especially since the strips were actually scraps were from another crafting day! I keep my scraps of DP in the same package just incase I find a cute way to use them, and I did! My card design comes from last week's Freshly Made Sketch. And since I have a Christmas card for you, it fits the current SUO Challenge and the TGIF Challenge! So here's my card...
Supplies:
Stamps: For Unto Us
Ink: Pretty Peacock
Paper: Whisper White, Seaside Spray card stocks, Feels Like Frost DP
Accessories: Metallic Pearls, Dimensionals

annnd I decided it was maybe a bit too plain. It still needed something. So I made a second one! This time I embossed the Seaside Spray card stock, I added a bit of ribbon to the bottom of the words, and I changed the pearls I used! 
Supplies:
Stamps: For Unto Us
Ink: Pretty Peacock
Paper: Whisper White, Seaside Spray card stocks, Feels Like Frost DP
Accessories: Pearls, Seaside Spray Metallic Ribbon, Subtle Embossing Folder, Dimensionals

Yep, I like that one better! But they're both nice and mailable, and I really like the silver with the cool blue, makes it look like it feels outside, only prettier, haha! 

Now hop on over to Tricia's blog using the button below. Then hop on through the whole group. There aren't a lot of us. And let us know what you think, everyone loves feedback! 
And make a card to mail out to someone this week! People love paper hugs!! 

Saturday, November 21, 2020

New Paper Pumpkin Scrapping!

I've been doing a lot of crafting with Paper Pumpkin kits lately! Sometimes I follow the directions, sometimes I make my own whatever. When the newest Paper Pumpkin kit arrived this week, even tho this kit is designed for gift cards and gift tags, I knew I wanted those cute pieces in a scrapbook! I was excited to discover I had already printed pictures of last year's graham cracker houses, and today I got a chance to do that! 

Supplies: 
Stamps: Jolly Gingerbread Paper Pumpkin kit, Taffy Alphabet (long retired)
Ink: Cinnamon Cider, Blushing Bride
Paper: Blushing Bride card stock, Jolly Gingerbread Paper Pumpkin kit, White Velvet paper (retired)
Accessories: Jolly Gingerbread Paper Pumpkin kit

Here's a close up of each page... 

and an even closer up of the kit pieces! There are three cute houses and fronts, some stamps to make it fancier, and the super adorable candy stickers!

Friday, November 20, 2020

Teacher Gifts

This is the second PP kit I started to finish up the other day. This is the Gift of Fall kit from Aug 2019. I put together this cute gift sack for one of the teachers. She'll get a candy bar and a few cards to use. 
This teacher will also get a few cards to use, plus a Walmart gift card. Her thank you card was made around the time this kit came out, so I used more of the blue in the gift sack to go with it. 
And a couple more teachers will get a thank you card, and a Walmart gift card each. 

I've never done teacher gifts at Thanksgiving before, usually only at Christmas and the end of the year. But right now, I figure the teachers do so much when it's "normal" out there, I can't imagine how stressed out they are this year!! Do you know any teachers who could use a paper hug? I have two little gift sacks left! Want one? Let me know! 

Tuesday, November 17, 2020

Old Paper Pumpkin Thanks!

Today I decided to pull out some Paper Pumpkin kits and try to crank out a bunch of thank you's...and some autumn hugs! And then I had another idea. First I got to work with finishing off the Layered Leaves kit from Sept 2017. The kit has tiny cards and gift pouches. I prefer standard, full size cards, so I just use the layered stack on a full size card like this:
Supplies:
Stamps: Buffalo Check, Sept 2017 Paper Pumpkin
Ink: Cajun Craze
Paper: Very Vanilla, Crumb Cake card stock, Sept 2017 Paper Pumpkin
Accessories: Sept 2017 Paper Pumpkin

Or, like this:
Supplies:
Stamps: Sept 2017 Paper Pumpkin
Ink: Cajun Craze
Paper: Very Vanilla, Soft Suede card stock, Sept 2017 Paper Pumpkin
Accessories: Woodland Embossing Folder, Sept 2017 Paper Pumpkin

My other idea was that since *I am not going to use these tiny and cute cards, maybe someone else would! So I went ahead and assembled them anyway, and figure I'll sell them in bundles of four, for $5 total. These are 3x3 cards, with coordinating envelopes. They are NOT mailable as they are, but they're great for dropping off a little something, or including in a package. 


And, if there is interest, I can sell these gift pouches for $1.50 each, or all four for $5. Assembled, it measures 5"x2.75". It's a card stock "pillow box" that can hold anything that small. 
And! I think I'm gonna see what else I could possibly sell, and put these cute Paper Pumpkin kits to better use spreading joy than gathering literal dust in my basement! haha! 

Monday, November 16, 2020

One Done!

It isn't quite Thanksgiving and I have one whole calendar done and the second one is sooo close! I am super excited about that! Over the weekend I got three more pages done, which completed the first calendar.
Due to some rearranging, I decided to find some "favorite" snapshots that didn't fit in the pages because of theme or other reason, and used some digital pocket-style cards for my inlaws' cover. Pretty sure I have never put photos on the cover before...and that's saying something! 

Supplies: MDS
Covid & Social Distancing pocket cards from Practical Scrapper.
good day, #stayhome, wash your hands & quarantine pocket cards from Persnickety Prints.

That "rearranging" was because when I originally shared this second page, back in April, I intended for it to be a one-time thing :p and it would be the March page. Obviously, this darn pandemic isn't going anywhere, and certainly hasn't all year long, so I moved it to be the cover for my parents' calendar instead. So as a refresher, here's their cover page: 


What are you finishing up this week? Or getting started on? 

Saturday, November 14, 2020

The Season of Gratitude

I have sent out a lot of cards this year, but I decided I want to do even better this month. Our state has pretty much shut down again and our school moved to a hybrid situation this week. Those teachers need to know they're appreciated! And that means I need some more thank you's ready to send out asap! Today I took some time to put this card together, using the latest Mojo Monday sketch, and this fabulous DP! It was very quick aside from fussy cutting the flourishy frame. And hopefully tomorrow I can get a stack sent out in the mail...! 
Supplies:
Stamps: Very Versailles
Ink: Cinnamon Cider, Misty Moonlight
Paper: Very Vanilla card stock, In Good Taste DP
Accessories: Embroidered Ribbon, Metallic Pearls, Dimensionals, Glue Dots

Thursday, November 12, 2020

A Completed Project!

Waaaay back in Feb of 2016 I started putting together a Project Life album of our family vacation the summer before. That day I got about half of it assembled, and I even blogged it HERE. Then I had to put it away, probably to make dinner, haha, then I never got back to it. As in, we moved a few months later, and I had a baby a few months after that, then we moved again, and it's been in a box! Til this summer! I think in August I assembled the rest of it, completely putting everything together. (that's 18 pages, plus tidbit details) Then today, hahaha, I finally got all the journaling done for the whole trip! And that was a lot of pages! 29 finished pages! 

Here's just a few to show you what I did and how easy Project Life/pocket style scrapbooking is, once you get everything turned the right direction, lol. That can be tricky, and is definitely the most time-consuming part. After that it's so fast! (It only took four and a half years! But really just three days....)

The very last page was done traditionally, because what do you do with the other side of a pocket page, when you dont' scrap chronologically? haha.... I still used the pocket inserts and the little accessories that came in these Project Life kits.  
I'm quite happy with how it all turned out! AND I'm excited to get that whole week on the shelf for my kids to enjoy!

Wednesday, November 11, 2020

Wedding Crafting!

My little sister just got married and I made the card box for the gift table. She saw an idea in a store, but didn't want to spend $40+ on something she was going to use once for a couple of hours, so I was asked to make something similar. 

I found a box, took off the shipping labels I could remove, taped it shut, and cut the hole out to put the cards into. I painted it all white with acrylic paint. Then I bought a roll of burlap and stewed about how to get it on the box and make it stay and laid it out and talked to friends... one suggested staples might hold it on without making a mess? It totally worked and it worked great except for the top where the hole was- it wasn't sturdy enough to take the staples, but it worked well enough everywhere else that it ended up okay. There is no burlap or paint on the bottom, that way my sister could just cut that end open to get to the cards inside. 


The better looking side of burlap got to be the front, haha. I decorated it using a lot of retired stash! 
First the strip of White Jute ribbon, then a strip of Old Olive Mini Chevron Ribbon. And finally I made the "medallion" part. That is a Pearlized Doily, backed with a little more jute ribbon, and topped with a twist of the Olive Chevron, then a bow made from Silver 1/8" Ribbon, and finally a wooden "love" which came from a Paper Pumpkin kit! They're all held together with glue dots and sticky strip and it held up! 
...until the crazy wind started throwing everything around and the rain was pounding, haha..... But it looked pretty anyway! 
~~~
I also put together a bunch of activities to keep the kiddos occupied. Just in nieces and nephews alone, we're at 8 kids between 2-11, and we didn't know how many others were coming. I needed quiet activities that were also clean...hmmm..... I happened to remember my long-retired Bingo Board background stamp, so I put my daughter to work searching current and retired stamps for small images that worked for an autumn wedding...and maybe honeymoon, even tho the happy couple isn't going on a trip any time soon.
~~~
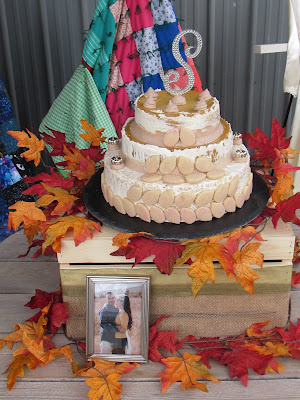
And finally, my husband was in charge of the wedding cake! He actually completely volunteered and was given free reign, so here's his "first, and likely only" wedding cake-
That is a rice krispies base, and two layers of pumpkin cheesecake. The leaves are a marzipan shortbread cookie and after they were baked they were painted with a cranberry/powdered sugar glaze. Finally it is frosted with a white chocolate buttercream for a "naked" cake look, and then dollops of maple cinnamon white chocolate buttercream to hold the tiny pumpkins and cookies on! 
Weddings are a TON of work, even if you live two hours away and aren't the couple or their parents! Sheesh! hahaha! 

Tuesday, November 3, 2020

October Calendar Page

Happy Tuesday! Election day around here! I am grateful for the right to vote.

I was excited to put together the October calendar pages the day after Halloween! I'm going to get these done early this year, haha! Today I'm sharing the page for my in-laws. It features just my own little family, and I used the exact same layout and products to do the page for my parents. 

This page is fun but it still shows the reality of 2020 and it's effect on everything. Masks at the pumpkin patch, and we had a tiny Halloween party at home, with two friends, instead of traditional trick-or-treating. The kids still had a lot of fun, which I was glad for. We made a point to do video calls with grandparents while in costume, which is the tiny photo on top. And we kept the traditions of visiting the pumpkin patch, carving jack o'lanterns, and watching the best Halloween specials like The Great Pumpkin! 

Only six pages left til these calendars are done! What are you busy creating? 

Sunday, November 1, 2020

We Create Bloggers: Bundle Up!

November first is here!!!
I am excited for a whole month when most of the people I know are focused on gratitude instead of all the unrestrained anger that has been going on in the world... And we've got a new blog hop for you today! 
This time we're focusing on bundles...and bundling up! It was really, really cold this past week and then will be unseasonably warm this week...? But maybe you want to bundle up at your house!
Anyway that was the inspiration for the paper I for the background of my card. I used my favorite current bundle (that I own, haha) to put together this super cute card, along with the sketch from CAS Colours & Sketches. And here is my creation! 
Supplies:
Stamps: Nothing's Better Than
Ink: Memento Black
Paper: Whisper White, Soft Suede, Rococo Rose, Petal Pink card stock, In Good Taste DP
Accessories: Love You More Than dies, Big Shot, Fine Tip Glue Pen, Dimensionals

I popped all nine cookies up on Dimensionals, and then for the "cookies", I stacked three of the word- one in Soft Suede, topped with one in Rococo Rose, topped with one in Petal Pink! I don't typically do that, but I love how it turned out! Here's a pic of the dimension! 

Now hop along over to see what Libby has made for you. Then hop on through and see what everyone has created! And please leave us your thoughts! 
Finally, go spread some gratitude for the ones you love and send a card to someone! This one is going in the mail! 

We Create Blog Hop NOVEMBER 2020 Blog Roll
Tanya Harvey - you are here! 

Saturday, October 31, 2020

Happy Halloween!

Happy Halloween to you!
Today I have kind of a bonus post. My little one found our cookie cutters this summer and wanted to make Halloween cut out cookies ever since. We finally did it this week and since that makes a TON of cookies we shared some with neighbors too! I {almost} never make tags but I have a lot of Paper Pumpkin Halloween supplies that are kind of perfect for tag making so I used some up to make these plates even cuter! 

The tags used two different kits, Sept 2014 and Sept 2016, and the pumpkin tags used the Holiday Home stamp set which was released in 2014 for the little jack o'lantern faces...which you can hardly see! I layered them onto Old Olive rectangles and then just taped that onto the cookie plates! 

And finally, here's my cute Little Red Riding Hood who got to dress up for her preschool party this week! 

Friday, October 30, 2020

More Halloween!

Happy Friday! 
I had a few more Halloween cards I mailed out, but I wanted to wait til they were in the mail before I posted.
These were so quick to throw together once I got going! I chose the sketch from Freshly Made Sketches. I just used one pack of old paper, two sheets in fact, and a few old words! 

Supplies:
Stamps: Sept 2014 Paper Pumpkin Kit 
Ink: Memento Black 
Paper: Pumpkin Pie & Old Olive card stock, Halloween Night DP (retired)
Supplies:
Stamps: Wonderfully Wicked (retired)
Ink: Memento Black 
Paper: Pumpkin Pie card stock, Halloween Night DP (retired)
Related Posts Plugin for WordPress, Blogger...