Tuesday, July 29, 2014

More MDS!

I apologize for the lack of new blog posts, I've been out of town the last several days, on a family vacation, which is kind of a huge deal for us, haha...
Here's the first scrapbook page from the trip, but I'm sure there will be a ton in the future...ahem... *grin. I know, its more scrapbooking, but hey, I can take MDS anywhere, and it doesn't even use up the data stuff with the internet hot spot on my husband's phone! Yeay for that!
This time I used the latest sketch from MDS Monday. I gotta say, I'm kind of liking actual white for the white space on my pages lately.. and that's new for me!

Supplies:
MDS: Candid Frames download, Burlap Ribbon download, Now We're Cookin' stamp set, Big Top Birthday DP, Lemonade Stand content disk

Thursday, July 24, 2014

My project!

No stamping today, but creativity just the same!

Way, way back in March I mentioned that I had a painting project keeping me busy that I was hoping to share soon. Yeah. Well, now it's July...and I can finally share it!
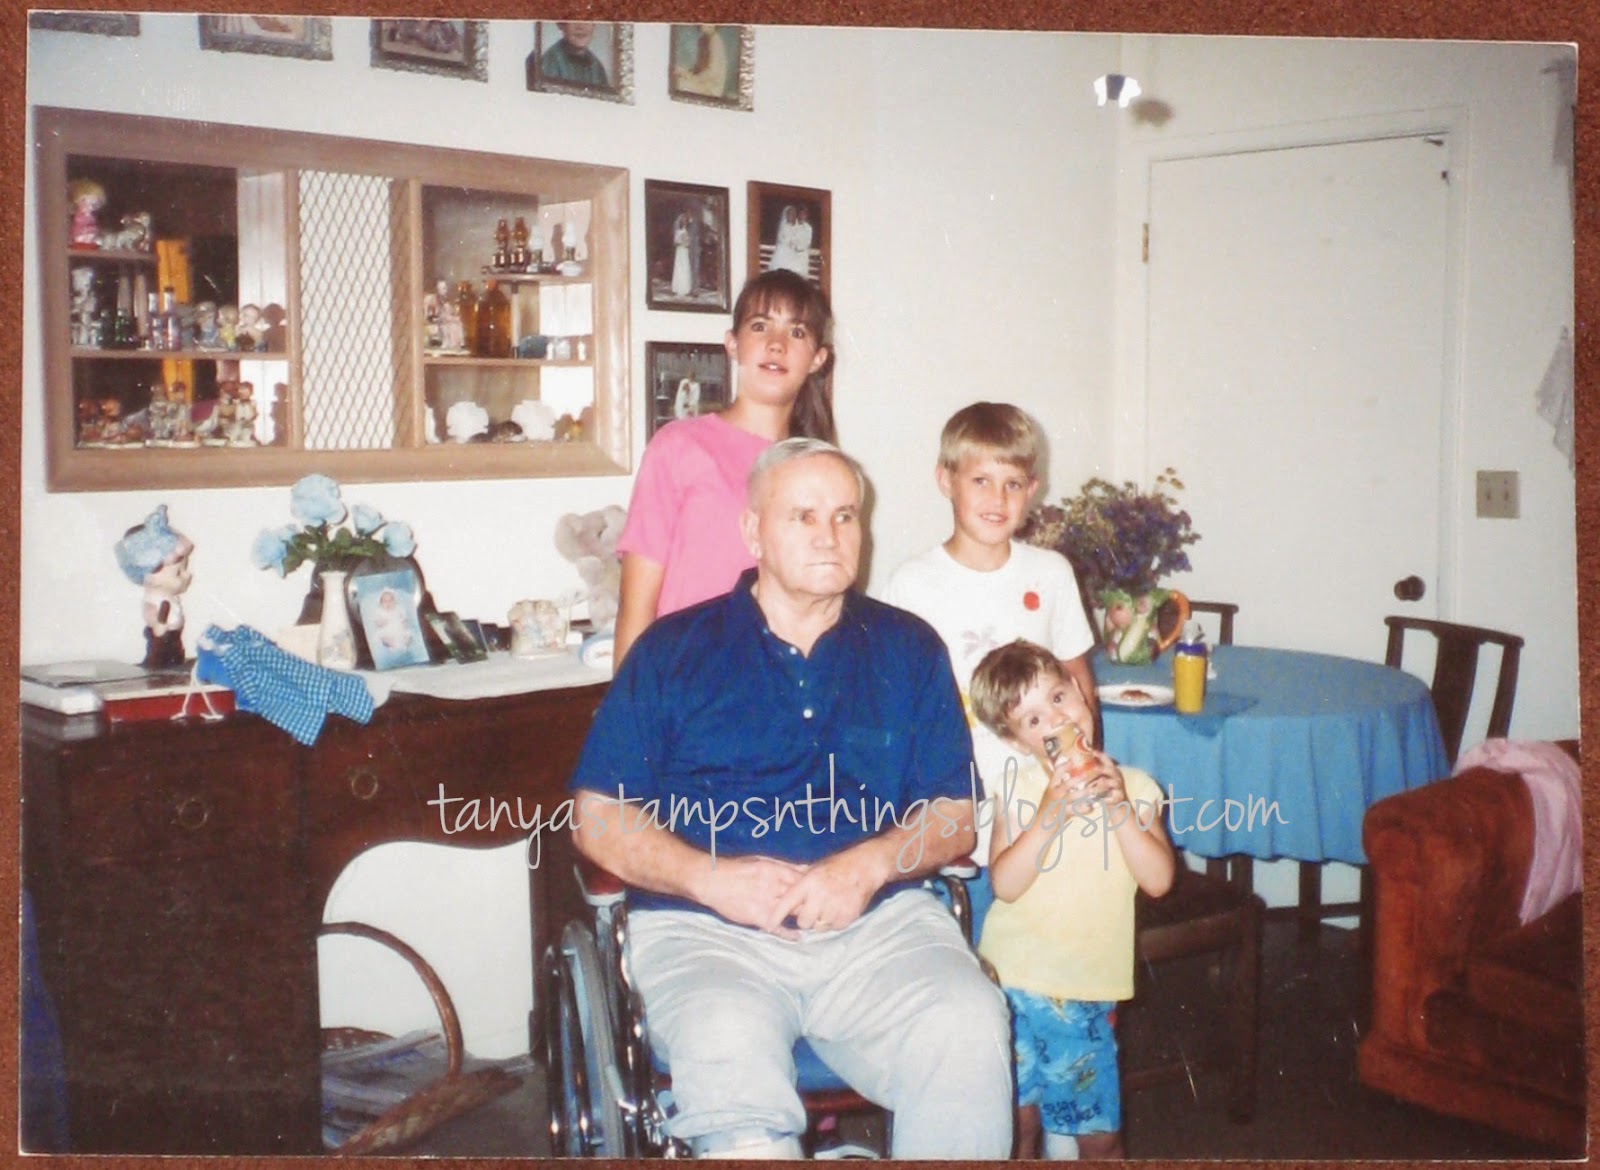
Two years ago, after my grandmother passed away and her kids went thru the things in the house, I got to be the lucky owner of this shelf.
For as long as I can remember, it hung in my grandparents front room, as shown below. The furniture changed rather frequently (says the girl who visited once or twice a year), but the wall never did, except to add my aunts and uncle's wedding pictures. As much as I didn't like the distinctly 1960's finish, I thought the shelf had potential, and I wanted it!
My mom brought it home to me, two years ago last month. And it sat in my living room....til it moved to my bedroom.....it might have gone to the storage unit for a while...but finally, in March, I sanded it down, taped the mirror off, and chose a spray paint color!
And then...it got rained on while "drying". So I had to sand it down and spray it again...
And then! it sat in my house waiting to be hung...but getting banged into and chipped and...grr!
So I painted it one more time (ok, like 5 more times...) and insisted it be hung that very day! Which is a two-man sport...ahem.
Annnd then it hung empty for another month or so...
Until this weekend.
We had a big family event at our house on Sunday and I wanted the shelf decorated, and I wanted to fill up an empty wall. So check out what I got done on Saturday!
The shelf now looks like this:
(and closeups...)

And the empty wall was planned out to look like this:
And with a little more spray paint and rethinking some things (like a mirror 5 inches away from the ceiling?) now looks like this!
I LOVE IT!!!!
The photos on the wall, the colors, and the decor in general makes me so happy to see! My kids love seeing so many pics of themselves on the walls. I also updated their annual portraits so that's fun too... but I like that I was finally able to put my own style on my own wall!
And! Really it only took the one day, and not very much money.
4 cans of spray paint, frames from thrift stores and the dollar store, and other pieces I already owned. Kerbam!
Purty house!

Wednesday, July 23, 2014

Mayflower Display

My daughter is incredibly proud that her 10th great-grandparents came from England on the Mayflower, so when we saw this display at the 4th of July event we attended, we knew she was going to stick around there a while!
She really enjoyed checking out the scale model and all the bits they had on display.
My favorite part was the guy in the photo in the bottom corner- he was clearly there all day, and kept letting people know to check the list of passengers and "if you had the same last name, you were probably related..." My daughter asked if she could go tell him she already knew her relatives, and when she did, his response was "Well then let me shake your hand." *grin!
Supplies:
MDS: Domestic Goddess Content Disk DP, Button Latte download buttons

This page also was created for the Picture is Worth 1000 Words challenge on Splitcoaststampers. We were supposed to create a page based on this picture:
Hence the plaid and the buttons.

Tuesday, July 22, 2014

Birthday Photo Shoot

As I mentioned, my son had a birthday this month, and that meant new portraits! He and I went out one evening and took over 80 photos...*ahem... The cool thing is, he set up all the photos. He'd choose a spot based on the background and pose, haha! I narrowed it down to these favorite shots and was so excited I had to scrap them, haha! I used Cheryl's National Scrapbook Day layout for the page.
Supplies:
MDS: Days To Remember DP, recolor tool, punches,
Font: 1942 Report

Monday, July 21, 2014

Grand Old Flag

Happy Monday to you! Wonder if I get to relax after this weekend...? hahaha...right...
But, I DID make this page to fit a challenge about the song "Grand Old Flag". The page is all about our 4th of July this year, I got a flag, or eight, and some red and blue, so I'm pretty sure it fits. I know, its a ton of photos for one page, but I still had another "chapter" of the day left that will need its own pages, haha...so this is what I got.

Supplies:
MDS: Land of the Free

Friday, July 18, 2014

Pool Page!

Happy Friday to you! Any big plans for the weekend? I have a very busy weekend coming up with family events! I'm just glad I have a game plan for it! haha!

We'll end the week with a scrapbook page, this time using the latest MDS Monday sketch and challenge! These bright colors and busy DP are a little out of my normal comfort zone, but I think they suit the page very well. I had a hard time finding a photo I wanted to feature one small section of!
Supplies:
MDS: Extreme Elements stamps, Big Top Birthday DP

Thursday, July 17, 2014

Flowered Thanks

Quick post today.....
Today's card uses the current Clean & Simple sketch. It called for circles, but I went with flowers. And a lot of blues. And I like it!
Supplies:
Stamps: Summer Silhouettes, Lots of Thanks
Ink: Island Indigo, Lost Lagoon, Bermuda Bay, Soft Sky, Old Olive, Crumb Cake
Paper: Bermuda Bay & Whisper White card stocks
Accessories: Brights Candy Dots

Wednesday, July 16, 2014

Birthday for a Boy

Today is my son's birthday. There's a friend party today, and more family celebrations this weekend... while I smile and ignore the fact that he is growing up entirely too quickly and it's kind of freaking me out...

The first thing I *knew I was getting from this catalog was this stamp set, because the instant I saw it, I knew I could use the lego image for yeeeeears. And, as expected, this was the first image I used from the set once I got it! And I happen to know he's going to love it!
I used the July #1 sketch from Viva La Verve for the layout.
Supplies:
Stamps: Boys Will Be Boys
Ink: Coastal Cabana, Tangelo Twist & Baked Brown Sugar markers, Tangerine Tango
Paper: Coastal Cabana, Baked Brown Sugar, Whisper White card stocks
Accessories: Retro Fresh Washi Tape, Decorative Label Punch

And just to reiterate my earlier point about legos for yeeears....here's the invite from a previous birthday party...

and here is a scrapbook page in the first digi book I made- which! he got as a birthday gift a few years ago!
...legos and birthdays apparently go hand-in-hand for this one. And that is FINE with me!

Tuesday, July 15, 2014

Woodgrain Thanks

Here's another card that used a bunch of supplies... and I think it's kinda fun.
For this card I used a recent Clean & Simple sketch, and kinda mixed it up. I stamped and embossed the bottom section, and repeated the sentiment a couple times. The punched flowers are popped up on Dimensionals, with Cajun Craze Candy Dots. I like the pops of color!

Supplies:
Stamps: Gorgeous Grunge, Lots of Thanks
Ink: Crumb Cake, Soft Suede, Early Espresso, Island Indigo
Paper: Crumb Cake, Island Indigo, Crushed Curry
Accessories: Petite Petals Punch, Chevron Ribbon, Big Shot, Woodgrain Embossing Folder, Regals Candy Dots

Monday, July 14, 2014

Good Thoughts!

I had a great weekend- how about you? I even got some cards stamped! Were you tired of pages? I played with some sketches and had fun! So we'll get right to it!
Today's card is a happy way to start off a Monday! I used the latest Freshly Made Sketch and the latest In Colors for this card. I even know who just to send it to!
Supplies:
Stamps: Papillon Potpourri, Perfect Pennants
Ink: Hello Honey, Blackberry Bliss
Paper: Hello Honey, Blackberry Bliss, Whisper White
Accessories: Big Shot, Banners Framelits, Neutral buttons, Linen Thread, Dimensionals

Wednesday, July 9, 2014

Scrapbook Demonstration!

Oh for goodness sake! All those days with nothing posted....I could have posted this page I demo'd at my workshop in June! oh well....that's what you get today! *grin

I started by wanting to use the Work of Art stamp set in a flag design. I've seen soooo many variations of it on Pinterest and I love it! I don't really have a use for patriotic cards but I can definitely put it in a scrapbook! I chose to stamp the rectangly piece in Pacific Point and then heat emboss a white heart on it, and use the chevron piece for the stripes. Then I had to look for printed photos that worked with a flag! These shots of my son in his Bear Cub Scout uniform fit well, I thought!
Supplies:
Stamps: Work of Art, Skinny Mini Alphabet
Ink: Pacific Point, Real Red, Versamark
Paper: Real Red, Pacific Point & Whisper White card stocks
Accessories: White embossing powder, Heat Tool

Also, I got to use a brand new alphabet stamp set that I just have to rave about! First of all- the worst part of alphabet stamp sets is the assembling. It is just so tedious putting together 26+ stamps! Guess what? This one is photopolymer and! is ready to go as soon as it shows up at your door!!! YEAY!!
Also, since its completely clear, you can line up stamps and make a word!! Sweet!!! You can fiddle with each letter to get them as straight as you want and just flip the block over to check. I love it! Alphabet sets always get a lot of use at my house but I think these will become my go-to letters!
What do you think? Have you tried any photopolymer stamp sets? This is a great place to start!!

Tuesday, July 8, 2014

Friends!

Continuing along the theme of my friend leaving, I made this page for myself, of the group picture we took. I used a recent MDS Monday sketch for the layout, and I'm really happy with how it turned out! It is simple, but really that just means it was quick and easy to put together.

The ombre stripes were super easy- I made a rectangle out of a square punch that covered the page, overlapping the ends. I started with Midnight Muse (colors in MDS never retire!!!) and just changed the opacity by 20%, with each copy/paste! I also changed the opacity on the white "stamps".
Supplies:
MDS, Enjoy Every Moment digi stamp set, Simple Friendship digi stamp, Greatest Moments digi stamp, Jenna Sue font

Monday, July 7, 2014

a friend's farewell...

Yeah, I too noticed that I was posting daily and now I'm not. haha...
I was also stamping more, and now I'm not.
What am I busy with? Well, on top of things like swimming lessons, babysitting, my son mowing my parents lawn every week, attempting to cram summertime fun into the days...and all the normal parts of being a wife and mother...our very good friends moved away this past week! The kind of friends where the dad's are movie buddies and the mom's are always chatting about this or that, and the kids are all friends too. Rats. We helped pack, load, unload and clean. Fortunately they are only about 30 minutes away, so we'll still be able to visit...it just won't be the same as having them right out the back gate.

Aside from helping with the move......
One of the little girls told my daughter that she hoped her friends would give her something to remember them by. aww...! My daughter and I decided that friend photos would be great! Another mom suggested that a little photo album full of pics of their friends would be even better! (of course I agreed 100%- have you seen my photo addiction/scrapbooking problem?! haha!) And another mom suggested a disk of all the photos we've taken together! Love it!
So! We took pictures of the groups of friends...
we put together small albums with photos and notes...
(I put together two of the kids' albums and the mom's)
and the disk of photos evolved to an MDS slideshow, including music, burned to a dvd that the kiddos can watch anytime they want, home-movie style! hahaha!
Most of my MDS "pages" were kept suuuuper simple! I just used the pre-designed photo layouts for almost every page.

Then I created a title and ending page, which are identical except for the text. (this is the end...)
And then! I even stamped on the disk sleeve! 
(note: Stampin' Up!'s ink does not stay on a disk. It never dried. Came off super easy with a clorox wipe!)
So! Plenty busy, using my stamp supplies, but very little to blog! haha...

*Slideshow Supplies: 
MDS, Lemonade Stand content disk, Sycamore Street embellishments, Font: Throw My Hands Up
*Disk Sleeve Supplies:
Stamps: Six Sided Sampler, Teeny Tiny Wishes 
Ink: Lost Lagoon, Pumpkin Pie, Basic Gray

Tuesday, July 1, 2014

Blog Hop: Bundle & Save!

Today is the 1st?! What?! I totally thought we had more time in June- where did it go??
Anyway! As always on the 1st of the month, we have a blog hop today and I hope you'll stop by everyone's awesome projects! This time we're featuring the products found in the NEW catalog, under the category of "Bundle & Save"! This means if you buy the stamp set, and the coordinating punch, die, or other product, you save money! And who doesn't love that?!

For my Bundle & Save selection, I'm using the stamp set Four Frames, along with the Designer Label Punch, which coordinates perfectly. I also used the recent Freshly Made Sketch for the card design.
I've had these two products for a while, and I do really love how our punches frame our stamps so well. This particular set makes a great focal point on any project I use it on! This bird also works really well for masculine cards, and I know a lot of people struggle with those! Not to mention, buying this set together saves you 15%! Yeay!!
Want to see other coordinating products that save you money? Look for this in the catalog...
or! just continue on to Cheryl, and the rest of the We Create Bloggers, and see what everyone is featuring today!

Project Supplies:
Stamps: Hardwood background, Gorgeous Grunge, Four Frames, Teeny Tiny Wishes
Ink: Pistachio Pudding, Baked Brown Sugar
Paper: Pistachio Pudding, Very Vanilla, Baked Brown Sugar
Accessories: Designer Label Punch, Corner Rounder punch, Neutral Buttons, Dimensionals, Glue Dots

*I don't usually use SO many stamp sets on one card- the Teeny Tiny Wishes was designed to coordinate with the Four Frames set, which is why it fits so nicely. And I think a panel of DP would work nicely in place of the Very Vanilla, but as I don't have any current DP, I stamped it myself! Also I really like the Hardwood background for added texture on the card!
Related Posts Plugin for WordPress, Blogger...