Saturday, March 29, 2008

April News

If you're on my customer email list, you should have received most of this in my newsletter. Otherwise, read on!

  • Stampin’ Up! is still running their hostess and customer specials thru April 30. As a reminder, anyone every $350+ workshop host earns an extra $25 in free hostess benefits! And the Free Wheelin’ deal is still going! See details here.
  • My April class is called Get Punchy! For $15 we’ll make several cards using a variety of punches! You’ll be amazed at the things you can create! Watch my blog for sneak peeks! I have this class scheduled in Honeyville on April 4th (RSVP required by April 2nd- that’s this week!) and again in Payson on Tuesday, April 22nd (RSVP required by April 19). Fee due upon arrival.
  • Something to take note of… Stampin’ Up! has had a shipping rate of “$3.95 or 10% of your order” for many years. However, as you well know, everything is going up in price. Therefore, as of April 1, Stampin’ Up! is raising the rate to $6.95 or 10%. Obviously this won’t affect orders placed at workshops. But sometimes we run out of supplies when there aren’t workshops scheduled! For this reason, I will try to combine all orders to keep shipping to a minimum. I will be placing an order between the 15-20th of each month, so if you are ready to place an order, give me a call and I’ll add yours on!
  • As always, give me a call if you’d like to schedule your own workshop. It’s a great time to do that right now! If you want even more stamp ideas, plus a discount, consider becoming a demonstrator with me! And pass this link on to any of your friends you think might be interested! Happy Stamping!

Weekend Sketch #41

Here is my card for Beate's Sketch. I tried her 4 1/2 x 4 1/2 measurement for a card...that was definitely new to me. But since I gave away my last baby girl card I thought I'd better make more! I used a Whisper White base, then a card front of Rose Red. A layer of this great turquoise flower print from the Friends & Flowers SS Kit a year or two ago, and then this little stamp from the current hostess set For A Friend. I stamped that in Tempting Turquoise and colored the flowers with Rose Red. Then I added four silver brads for a simple accent. It looks better sitting here than it does on my screen...Sorry the picture is so not good. It kept coming out blurry and I have no idea why!

Friday, March 28, 2008

Three More Cards...

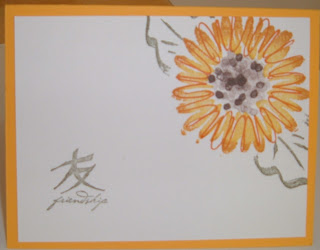
Here are a few more cards I made with my mom last week. I am looking and I'm not sure we used ANY current stamps! Sheesh! This first one uses Real Red card stock and ink, and Whisper White card stock. We used the Wild Hearts background stamp and I can't remember the name of this heart set, but it was the one for the American Heart Association fundraiser. And then a tiny bit of red satin ribbon from my mom's craft box. Am I still in Valentine mode? This second card is one of my favorites. We used the Sketch It set with the rock & roll technique, plus the 2-step Stampin' and it makes a super cool sunflower! So I think we have Summer Sun, More Mustard, Pumpkin Pie, Chocolate Chip and Always Artichoke inks. This also follows Lauren's sketch from last week, by sheer coincidence! Anyway, we stamped it on white and layered that on Summer Sun. Oh, and we used Symbols of Solicitude on this one as well. This flower came from a mini catalog and the set is called something like More Petal Prints... maybe. For whatever reason, every time I use this flower, I go with a hot pink! This one MUST be in hot pink!!! So I have Whisper White for the base, a layer of Pink Passion, a thin layer of black, then stamped on White. I thought the black gingham ribbon worked really well too. Can you see the butterflies stamped on the wall behind the photo? That's my mom's craft room! (also retired stamps!)

Thursday, March 27, 2008

Sympathy Cards

What I find really odd is that I had a need for two sympathy cards, from the same morning, half a world apart! But here they are... This first one I made last night. I used Certainly Celery for the base, then a strip of Perfect Plum beneath the white. I stamped the only flower set I have in my house right now (???) with the same two colors. Added some Celery grosgrain ribbon, Celery brads and then this cool heart. I inked the chipboard tiny heart with Perfect Plum ink and let it dry. Then I drew 2-Way glue pen all over it and dumped Dazzling Diamonds glitter over that. I am really happy with how it turned out. And I used the closest 'sympathy' word stamp I had. I think it works tho. The second card I have to confess, I made at the very first workshop I ever attended. We used the now retired Terrific Tulips set, and I think Mellow Moss and Orchid Opulence ink. (For those demos who hate Orchid, I think this looks pretty good!) The wide organdy ribbon is long since retired and the greeting is too, but comes from All Year Cheer I. I hope its not horrible that I'm sending an "old" card, I think its still very pretty, and time to clean out my card stash and share with others! Now seems like a good time to use this one...

Wednesday, March 26, 2008

Be Inspired Challenge #6


I tried Beate's inspiration challenge for the week, found here and this is what I came up with.
 
I actually put a LOT of thought into the page, which is not typical for me. I wanted to use Gable Green, based on the skirt, but it didn't work with my pictures at all. And I didn't center the title very well...
 
Anyway, what I used was a Night of Navy card stock base, a layer of Soft Sky card stock, then a layer of Whisper White. I stamped the swirly's from Priceless in Night of Navy ink, then sprinkled in little Barely Banana flowers. I matted the photos on Barely Banana card stock, tied some Natural Hemp to the bottom half, used three Banana brads in the top corner and stamped my title in Night of Navy. I'll do more journaling in the white section above the hemp.
The photos were taken March of 06, when Burt and I took an night away from the kids for my birthday!

Monday, March 24, 2008

Making Cards!

I mentioned I was at my mom's helping make cards. Next summer she is going to chaperone a foreign exchange group and she is giving bundles of hand stamped cards to the mothers and grandmothers in the homes she visits (most of whom will not speak English, which is why we left off greetings!). We made over 20 cards in two days this weekend, and that's really significant when you realize we had to keep an eye on my kids and everything else that comes up in life... So here are three of my favorite cards. I'll post more another time. This one uses Heartfelt Thanks. Its such a beautiful set and you can use the same image over and over in all kinds of colors and shades. For this card, I went with a Pumpkin Pie base, a layer of Bravo Burgundy, and a layer of Very Vanilla cardstocks. I stamped the outline flower in Burgundy along the side. I stamped the flower in Burgundy, a Pumpkin center and Always Artichoke for the stem. I tied some retired burgundy organdy ribbon around it for a very nice, simple accent. This card uses another of my favorite but retired stamp sets: Time With You. I thought a nice, springy card would be great, so I chose Gable Green for the base. The main image is on Whisper White, stamped in black and colored with Stampin' Up! markers. Then just a little black gingham ribbon to finish it off! This card was really cool. My mom did this one. First we did the polished stone technique on scraps of photo paper. We used the retired Copper ink refill with Summer Sun and Cameo Coral. She layered them onto a Summer Sun card base, stamped the image from Lovely As A Tree in Basic Black and added some black brads from the Vintage Brads set! Cool, huh?!

Saturday, March 22, 2008

Baby Cards for a Weekend Sketch!

I'm at my mom's and among other things am helping her get cards made. She had to leave and said "if you get a minute, try to get some baby cards done." This is what I did. I used Beate's weekend sketch for a start. All the stamps are retired, but some of my favorites.

This one uses Toy Box and All Year Cheer II. I used a Bashful Blue base and tag, a Whisper White rectangle and then Real Red for the star. I then forgot which shade of blue I was using and colored the images with Ballet Blue...but it still works! I used silver brads and Real Red gingham ribbon for an accent. (I'll try to crop and edit the photos when I get home...Sorry!) This one uses the Welcome Little One set. I bought that for my daughter's birth announcements and I still absolutely love it. I used Pretty in Pink for the base, then a layer of Lavender Lace, then Whisper White for the main image. I used Apricot Appeal for the scallop punch-ed piece. I colored the baby with markers. I also used a retired organdy ribbon on this one.

Very cute, and a little more involved than my usual card making. Soon I'll post the rest of the cards my mom and I are making. LOTS AND LOTS!

** cropped photos added!

Thursday, March 20, 2008

Shoebox Swap!

Last night I got to attend a Shoebox Swap with two other demonstrators in the area. It was so fun! A Shoebox Swap is when you design a card and then take all the supplies used to make it in a box and pass the box around and everyone gets to make one of your cards. This one was so that we could try out the new stamps in the Occasions Mini. So, I posted several days ago a star card, which was one of mine, and here is my second card, using For Father. (Almost the same card as in the previous post, but this one we stamped in black and colored with pastels.)

Loni Spendlove hosted the swap. This adorable card is one of hers. We used the Big on Spring set. Its a River Rock base, and we used the Dotted background stamp with River Rock ink. Then a layer of Wild Wasabi, stamped on Whisper White, cut out the onesie using Soft Sky, colored the heart with a Rose Red marker... We used the 2 way glue pen and Dazzling Diamonds glitter for the word, then wrapped Soft Sky double stitched ribbon around the bottom, and used one of those Ribbon Slides from the new Hodgepodge Hardware kit found in the mini also! Isn't it great?! This second card is also Loni's design. We used the new Tart & Tangy set, and did a scratch 'n' sniff card!!! (mine doesn't smell very well but it looks great!) We used the new Summer Picnic paper from the mini too. We used the Scallop Punch with Old Olive cardstock, a Bashful Blue base, a little white grosgrain and stamped "sweet" from the stamp set Sweet Shapes. The next two cards were designed by Pam Clyde.

This card was so cool to make! For one thing, the bottom base is Really Rust cardstock. Then there's a card of Sage Shadow layered on top of that, so its just the Sage part that opens! We used the Friendly Flowers set. We used the Coluzzle to cut the big round part, then punches for the smaller circles. We used the very cool new Chocolate Chip Poly-Twill ribbon, and the Jumbo Eyelets with the Crop-O-Dile. Its a little hard to see, but we knotted the ribbon and its the center of the eyelet.

This last card (also by Pam Clyde) uses the Tart & Tangy set, plus the Polka Dots & Paisley words. Isn't that chocolate dipped strawberry great? We colored it with markers, then colored some Chocolate Chip marker where we thought the chocolate should be. Then we put Crystal Effects over the chocolate ink! How cool is that?! We used the scallop punch here too, the white gel pen for the dots, the Garden Green marker for the green words, the Slit Punch to make the scalloped edge, and then Real Red Gingham ribbon. Aren't these ladies talented?? I loved what they came up with. I got to try new stamps sets, but also new accessories and new tools too! Yes, my stinkin' long wish list just grew! LOL!

I hope you enjoy these fun samples and seeing ideas I would never have thought of! I know I had a great time!

Tuesday, March 18, 2008

Apples!

Again, I LOVE this set! Its from the new Occasions Mini and I keep using it! This first card is so simple and turned out really great. I used Ruby Red for the base and stamped the Canvas background with Close to Cocoa ink. Then a layer of Cocoa cardstock and then stamped the image using Ruby Red ink on Very Vanilla cardstock. Then two little brads from my Hodgepodge Hardware and its good! I keep talking about being ready for spring but I'm using a lot of autumn colors right now...! This second card is a step up with the same image and the same colors too. Close to Cocoa for the base, a strip of More Mustard, a layer of Ruby Red and the focal point is on Vanilla again. I used the brads to "hang" the picture, and I colored this one with my Watercolor Wonder Crayons and Blender pens. The ink was still too wet when I started coloring, but I started with the gloves and that ended up ok because now they look a little extra worn. Fantastic! Well, the kids and I have resolved to have a great day today, no more time-outs, no yelling, no being mean to anyone, everyone is going to be happy, be good, and have fun! (hey, its a start!) So we're off to play outside til naptime and enjoy the fleeting sunshine...because SPRING is coming!!!!

Monday, March 17, 2008

Who are you?

I know, I know, three posts in one day...WOW! But I was 'blog surfing' finding people I knew listed on blogs of people I know and I found this fun link. My second major Christmas gift was a Jane Austen collection. All of her writings in one big fat book! Now if I just had more time (or took more time) to read! Anyway, I just had to try this one...

I am Marianne Dashwood! Take the Quiz here!

And this is too funny! The movie Sense & Sensibility was my introduction to Jane Austen's works. I was about 16 and empathized far too well with Marianne. I watched it again in the past year and laughed and laughed thru tears becuase I remember being exactly like that! According to my answers at least, I haven't changed too much! This is what it says about me... "You are Marianne Dashwood of Sense & Sensibility! You are impulsive, romantic, impatient, and perhaps a bit too brutally honest. You enjoy romantic poetry and novels, and play the pianoforte beautifully. To boot, your singing voice is captivating. You feel deeply, and love passionately."

Weekend Sketch Challenge #39

Here is my card for the weekend sketch challenge. I used retired paper but a current stamp, from Pun Fun. Super simple card. I colored the bird with the retired Cranberry Crisp and Buckaroo Blue, and a touch of More Mustard, all found in the retired Treehouse patterned paper. In other news, I finally tried Beate's chalkboard technique, found below!

Sunday, March 16, 2008

A workshop!

Lots of photos today! I had a workshop on Saturday that we were out of town the whole weekend for. It wasn't 'all work and no play' tho - Burt and I got to go out for our Valentines/birthday date! We had a very nice night out, loved it! The following pictures are the projects I did at my workshop. This first one uses the Chalkboard Technique. Beate has a great tutorial on that at Splitcoaststampers.com. Her sample is also on her blog, Fresh & Fun, on my side bar. I used Chocolate Chip like she did, rather than black. Anyway, the card has a chocolate chip base, the So Saffron Prints Paper, a layer of Pumpkin Pie, then So Saffron, then Chocolate Chip cardstock. I used White Craft ink to stamp the flowers (from Heartfelt Thanks), and then sponged over them with my pastels. I tied Chocolate Chip Taffeta ribbon around the layered rectangle and added a Fire Square Rhinestone Brad for an accent. Sooo fast, sooo stunning! My second card I used the stamp set Priceless. I was going to show the So Swirly jumbo wheel with the set because of the upcoming Stampin' Up! promotion, but I forgot to bring the wheel with me. (I'll post details on that tomorrow. It doesn't use this set, but the idea behind sets and wheels...) So I have Bravo Burgundy for the base, then a layer of Almost Amethyst, then Pretty in Pink. I stamped the heart with Burgundy and cut it out, and stuck it on with Dimensionals. Then I wrapped a little bit of White Grosgrain ribbon around the pink and used my Easter Elegance Rub-on's on the ribbon! how cool is that?! Oh, I didn't use Versamark here, I used the actual colors of ink that match the paper. Here is a close up with the Rub-ons. It came out really clear and looks fantastic! This card was the Make & Take. I used the Sale-A-Bration set So Many Scallops here, with the Rock & Roll technique. That has got to be one of my favorites because its so simple but looks great! We used the crimper for the leaves, as found on Patty's website (also on my side bar). I let them choose either Cameo Coral or Ruby Red for the base, since those are the inks we used on the flower. Then a layer of Creamy Caramel, and then Old Olive for the stem and leaves. We added a cute little Caramel button in the center.

Thursday, March 13, 2008

Sale-A-Bration, Baby!

Sale-A-Bration ends Monday! Don't miss your last chance to get these sets free! I've got a workshop Saturday afternoon so I was playing a little more with my SAB set So Many Scallops. I chose this set because of the stars and moons on THIS stamp! I love, love, love stars and moons! I never got to paint, (renter, not owner) but I did what I could to decorate my baby's room in that theme: blue and yellow stars and moons! (curtains, bedding, pictures/art, piggy bank...!) So here's a very sweet baby card for a little boy. I cut out the yellow moon and stuck it on the blue moon with a dimensional. Add a touch of white grosgrain and two Soft Subtles brads and I think its perfect!

Wednesday, March 12, 2008

"Be Inspired" #4 and more

Ok well I may be taking challenges a little too literal! This was a lot cuter in my head than it is on paper... However, I DO like how the Rub-ons turned out! Anyway, this is based on Beate's Tuesday Be Inspired Challenge. I took cues from the colors, and patterns on each color and its loosely based on the layout. It isn't great, but I posted it anyway. Thanks Michelle, for your encouragement...! Recipe: Priceless stamp set, Sahara Sand, Soft Sky & Ruby Red cardstocks, Ruby Red, Close to Cocoa and Chocolate Chip inks, Rub-ons, brad. My second card is a design I'm considering for a shoebox swap I've been invited to participate in. If I do use it, I'll save us all a step and stamp the turquoise stars right onto the card front! I hadn't decided which color to use when I stamped and cut the stars, that's why they're layered on. The big red star is attached with Dimensionals, and the yellow stars are stamped right on. I used the Red Striped Grosgrain ribbon along the bottom third of the card, but it kind of blends in with the red and white layers of cardstock! What do you think? Do you think other demo's would want that card in a swap, or is it too simple?

Tuesday, March 11, 2008

More sneak peek!

Here is the masculine birthday card from my class next Tuesday! I LOVED this set the minute I saw it! Both our dads are difficult to make cards for. This whole set applies to our dads. YEAY! When you come to the class you can choose the image that works best for the men in your life. I colored with my pastels- which I haven't used in a long while. I sponged on some Ruby Red along the edges of the Vanilla cardstock to tie in the color. I think it turned out very nice, plus it was fast to do! Yesterday I took the kids outside despite a headache that kept developing into a migraine. That means I got NOTHING done yesterday. So now I'm off to help with homework, do some laundry and hopefully I'll be back tonight to participate in Beate's Tuesday challenge!

Monday, March 10, 2008

Another class sneak peek!

So for my March class we'll make THIS box! It will hold all 6 cards plus envelopes. You could give the entire set away as a gift, or you could use the cards yourself then fill a small bag with candy or other treat and give the box as a birthday treat gift! Who knew a night out with the girls could be so useful? Remember to get me your RSVP by March 14th. See more details below!

Friday, March 7, 2008

Weekend Sketch Challenge #38!

It was 41 degrees and sunny outside when Hunter came home from school, so we played at the playground for a while! Poor Sienna hasn't been out in far too long. That was still a bit chilly for me, and Sienna asked for hot chocolate when we came in...but maybe, just MAYBE spring will come soon! Here is my card for Beate's weekend sketch. I'm sorry the picture is so dark, I kept trying, I've got the window open, I even tried to add light in my editing program like I often do, but that made the colors really weird, and very bad. So this is what I have... I used a Certainly Celery base and the Prints Paper in Certainly Celery and Almost Amethyst, plus a pop of Pretty In Pink for a nice little baby girl card. I also have it opening on the side for a change! Its hard to see, but I used the circle stamp from the Sweet Thing set to add a scallop-y edge on the side of the pink rectangle. I like that little addition! I used some Amethyst ribbon from the Fairy Tale Ribbon set, and a pink brad. Today's sketch worked a lot better for me! :)

Thursday, March 6, 2008

A class sneak peek!

My March class will be held on Tuesday the 18th. I'm offering both a 9-11am and a 7-9pm class. We're going to make 6 birthday cards and a box to hold them in. The fee is $12 due upon arrival, but I must have your RSVP by Friday, March 14. So here are two of the cards we'll be making that day... This rocket card is perfect for a boy's birthday! I had to tweak my original idea but I like this one a lot better. My son came in and saw it sitting on my desk and said "Wow, that's a great card Mom!" so you know a boy would love to get this one. I used the Pun Fun rocket and the Classic Stars Jumbo wheel. I liked the idea of using a strip of paper smaller than the wheel- then no one will stress about making it straight! I think the buttons are a fun little accent too. This card is totally based on Beate's Weekend Sketch #37. Surprisingly, the one I had so much trouble making! I may alter it a little before the class, but for today, this is my plan (but your paper will be cut straight!). It uses the Cutie Pie paper, plus that really cute ribbon slide from the new Hodgepodge Hardware in the Spring Mini! I love that piece! Like these cards but don't live close enough to come? Sign up and I'll mail (or deliver) the supplies needed!

Tuesday, March 4, 2008

Beate's "Be Inspired" Challenge!

I came home to a box from UPS, so when I saw Beate's new challenge, I wanted to use my new stamps! I've also been itching to scrapbook so that is what I did! The inspiration was a black handbag covered in very bright flowers. I've never done a black scrapbook page so that was definitely new! I had to find a picture that would fit the colors and I knew I must have SOMETHING of my daughter in bright pink! I love her adorable, cheesy smile here. So! I went with Basic Black, Pink Passion, Green Galore and Real Red. I used my new So Many Scallops SAB set, with my scallop punch and my 1/2 inch circle punch. These stickers (me&my big ideas) I got for free at the copy store a couple weeks ago. It was their store's anniversary and they had a basket full of items you could choose. I thought sparkly flowers would be a lot of fun in her scrapbook, and I thought they matched today's thing perfectly. I even got a decent shot of it sideways so you can see what it looks like! I had a lot of fun...I need to scrapbook more!

Monday, March 3, 2008

As promised...

A couple days ago I used this wheel and said I'd have to post my scrapbook page of a mischievous child who got into chocolate. So this page is from maybe 2-3 years ago. Its really hard to tell but I had baked a cake (just for us to eat, not anything special- thank goodness!) and my very little boy climbed up to the table and sunk his hand right in the middle! He was THRILLED that he had chocolate all over his hand! Of course I had to take pictures of the whole process. When he'd eaten all he could get off, I took him to the sink to wash his hand and he cried and cried because I was washing off the chocolate!

Saturday, March 1, 2008

Sparkly Blue & Bright!

Two card using unique colors for me...imagine that! This first one I actually stamped a couple days ago. I caught a few minutes of a home-decorating show and they were painting lamps and things using colors awfully similar to River Rock, Bordering Blue and Night of Navy! I have never once used Bordering Blue! I only have it in marker anyway, which actually doesn't work so well with the shadowy part of this flower stamp... I also added River Rock double stitched ribbon and some dazzling diamonds glitter to add bling to the focal point. I think this card is fantastic! This bright card I stamped last night. I've been wanting to do these butterflies more like Monarch butterflies, which are one of my favorites. I really love doing the Rock-n-Roll technique with these butterflies! So, I used So Saffron (my favorite shade of yellow) with Only Orange, and then a touch of Gable Green. Its a softer, bright green. And the colors look a lot like the rainbow sherbet we had the other day...lemon, orange and lime! Then I added the white grosgrain and a birthday greeting and I'm very happy with it. See, I knew today would go better!
Related Posts Plugin for WordPress, Blogger...