Showing posts with label Greeting Card Kids. Show all posts

Wednesday, October 22, 2025

Witchy Halloween!

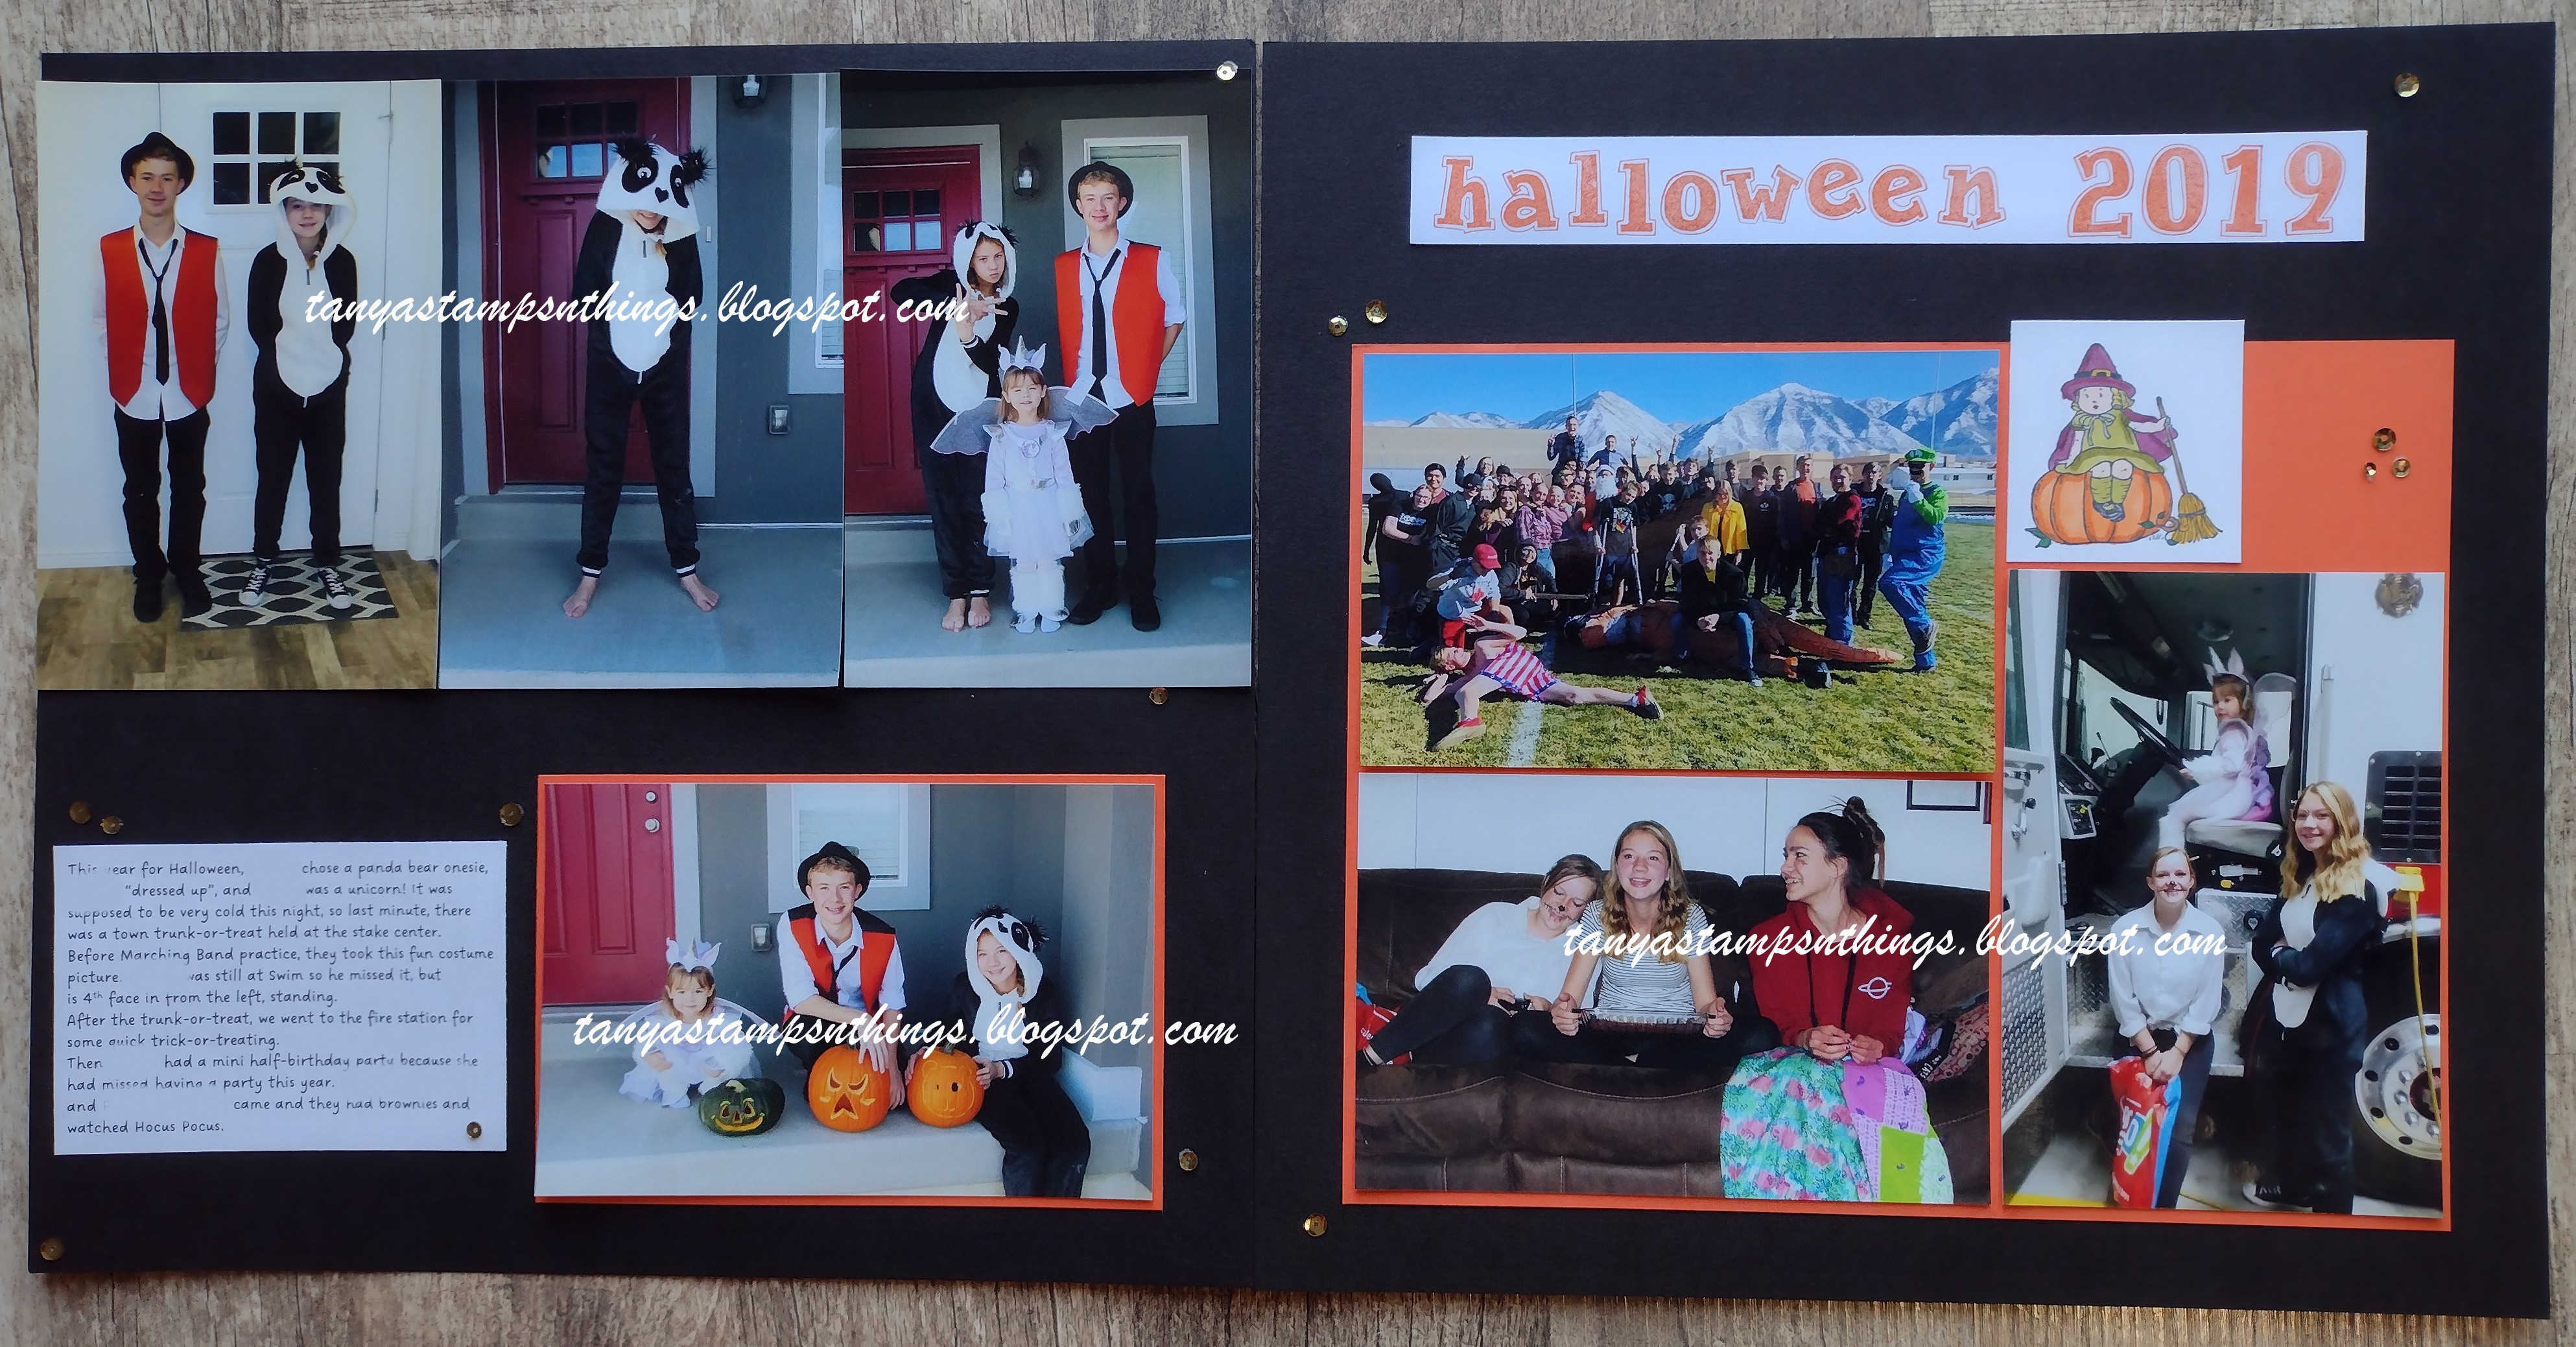
Happy Wednesday, apparently, ha. It's been a while! And I lost a day or two or something... 
But I'm back today with more Halloweeny scrapping! 
Supplies:
Stamps: Just Perfect Alpha, Greeting Card Kids
Ink: Memento Black, Soft Seafoam
Stampin' Blends: Light & Dark Pumpkin Pie, Light & Dark Highland Heather, Light & Dark Granny Apple Green, Bronze, Light Basic Black, Dark Daffodil Delight, Light Petal Pink
Paper: Pumpkin Pie, Granny Apple Green card stocks, Halloween Memories Two Tone card stock, Halloween Spells DP
Accessories: Shades of Green Hexagons, Pool Party Ribbon, Blending Brush

I stamped the pumpkin girl on a post it to cover my colored image. I used the Blending Brush to surround the girl with Soft Seafoam ink. It didn't turn out perfectly, but it's fine. The Granny Apple Green Hexagons are so transparent, they don't look at all green on the Gorgeous Grape base... Oh well. This kiddo loves Halloween and will be happy to have a new Halloween Day scrapped! 

Monday, October 24, 2022

Halloween 2019

Halloween is only one week away so I *might do a theme this week....

For today, I have this layout I did last week. I am super happy there is a package of black card stock for a hot minute in the July-December Mini! 
As is often the case with my scrapping, everything else is very. long. retired. The stamped little girl image was one of the first clear-mount sets I bought, and the alphabet was given to me from a friend, and came from before I ever heard of Stampin' Up! 

Supplies: 
Stamps: Greeting Card Kids, Alphabet Attitude Lower, Alphabet Attitude Numbers (1998)
Ink: Tangerine Tango
Paper: Basic Black, Tangerine Tango, Basic White card stocks
Accessories: Metallic Sequins, Glue Dots
Journaling Font: Dreaming Outloud Pro

These are the Stampin' Blends I used to color the cute little girl: 

Monday, October 21, 2019

Halloween Cards 3

Happy Monday! Today I have the end of the Halloween cards my mom made this year. What about you? Are you sending out any Halloween cards? Might be a fun thing...!

This first one is NOT retired. It is current except the card stock, and it is a CASE from HERE on Snapdragon Stamps.
Supplies: 
Stamps: Wonderfully Wicked
Ink: Memento Black, Elegant Eggplant (retired)
Paper: Tangelo Twist, Elegant Eggplant
Accessories: Monster Bash Enamel Shapes, Wicked Dies, Big Shot, Silver Embossing Powder, Heat Tool, Dimensionals

This card is inspired by THIS card on Pinterest, tho we used other, similar supplies.
Supplies:
Stamps: Home Is Where The Haunt Is, Tee-Hee-Hee, Haunting Halloween, 2016 Sept Paper Pumpkin, really old Paper Pumpkin
Ink: Memento Black, Wisteria Wonder

Paper: Whisper White, Basic Black, Wisteria Wonder, Peach Parfait card stocks
Accessories: Twinkle Builder Punch 

Stamps: Hey Ghoul Friend, really old Paper Pumpkin

Stamps: Greeting Card Kids, old Paper Pumpkin

Tuesday, May 7, 2013

Note Cards of Thanks

On Saturday my daughter chose to be baptized a member of the Church of Jesus Christ of Latter-Day Saints. {More info on that HERE.}
This is a really big deal so all of her aunts, uncles and cousins were invited, along with some other relatives who live nearby-ish, and of course her grandparents. Not all were able to come, but in addition to traveling and bringing food for a pot-luck lunch afterwards, some gave her little gifts as well. This means she needs to send out a lot of thank you cards!

I came up with two styles of thank you notes, completely inspired by Becky. These are such a great idea, especially for kids with a lot of writing to do. I've made them before for my kids to use and my daughter just loves them. So here's the bunch...
(please forgive the lighting!!)
and here are the closeups:
Supplies:
Stamps: Greeting Card Kids, Collage Curios, Forever Young (all retiring!!)
Ink: Basic Gray, Crumb Cake, Early Espresso, Bashful Blue (retiring!!), Certainly Celery (retiring!!)
Paper: Whisper White, Bashful Blue (retiring) and Certainly Celery (retiring!) card stocks
Accessories: Sycamore Street Ribbon (retired), Certainly Celery grosgrain ribbon (retired)

Wednesday, December 5, 2012

Christmas Cards #2

Now that my Christmas Card classes are done, I can share close ups of all the cards we made. And just in case your cards are not done (mine will be ready to mail out today!) you just might find some inspiration! This set of cards uses roughly the same supplies, and yet each card has a different feel to it! Love that!!


Supplies:
Stamps: Greeting Card Kids, Come to Bethlehem
Ink: Basic Gray, Cherry Cobbler
Paper: Very Vanilla, Basic Gray, Cherry Cobbler, Merry Moments Simply Scrappin' Kit
Accessories: Regals Brads, Crochet Lace, Dimensionals

Monday, November 19, 2012

Upcoming Card Classes!

I just needed to announce my upcoming Christmas Card class, for anyone interested! I made this flyer using My Digital Studio software. Click on it to see it bigger, but the details are also found below.
We'll be using the Simply Scrappin kit found in the Holiday Mini. We'll make 25 cards for $25 and I don't expect it to take more than 2.5 hours. I'll be holding my event on Friday, November 30th, from noon-3pm. And because I need to order the kit and prep the supplies for you, I'll need your RSVP and fee by November 25th. My friend Ellen will be hosting the same class the night before, in case you needed more information on that event.

And! Because I am enjoying the chance to show other ways to use your products, and because you'll take home some left over kit (if you choose to) here is a page I made with some of what was left over from my kit! These photos are from last Thanksgiving Day.
Supplies:
Ink: Bravo Burgundy Marker (coordinates nicely)
Paper: Simply Scrappin Kit, Very Vanilla & Basic Gray card stocks
Accessories: Cherry Cobbler baker's twine

Sunday, June 24, 2012

School kids

Here's another car for my display board...I love this stamp image from Greeting Card Kids. I thought this could be a cute thinking of you for a mom who's kiddos are all in school now, a 'best wishes" card for someone going back to school, a retirement card for a teacher, or a congrats card for someone who landed a new job as a teacher! But since I don't have a need for any of those today, I left it blank. hee hee!
The card design comes from a sample shown in the new catalog! I swapped out the colors but its the same idea!
Supplies:
Stamps: Greeting Card Kids
Ink: Basic Gray
Paper: Crumb Cake, Cherry Cobbler, More Mustard, Elegant Eggplant, Very Vanilla
Accessories: Regals Brads, Watercolor Wonder Crayons, Blender Pens

Friday, June 15, 2012

Love Card

Just a quick post today- It feels like I have about a thousand things to do and only a few hours left to do it all in! gulp!
This card uses the current Mojo Monday sketch. My favorite part is the heart tabs on the side! I designed the whole card without choosing a focal image, which is really unusual for me! This image worked pretty well, lol! At least it continues the heart theme!
Supplies:
Stamps: Greeting Card Kids, Itty Bitty Banners, Make a Cake
Ink: Midnight Muse, Baja Breeze, Basic Black
Paper: Whisper White, Midnight Muse & Baja Breeze card stocks, Patio Party DP
Accessories: Watercolor Wonder Crayons, Blender Pens, White Stitched ribbon, Dimensionals

Wednesday, February 1, 2012

Sweet, simple Valentine!

Here is a quick and cute Valentine card from tomorrow's class. I don't see what else you could use this one for, unless you swap out the image, lol! But I like it! I also feature the fun Sale-A-Bration ribbon! Its thin organza and very easy to use. You might want to choose that as your FREE gift with your $50 order!
Supplies:
Stamps: Greeting Card Kids, Teeny Tiny Wishes
Ink: Basic Black, Calypso Coral Marker, So Saffron Marker
Paper: Calypso Coral, Whisper White
Accessories: Sale-A-Bration ribbon, Watercolor Wonder Crayon (for skin tone), Blender Pen,

Friday, December 2, 2011

December!!

I can hardly believe it is already December! of course the weather isn't helping...the wind is unusually crazy, the leaves are still falling and the sky has been mostly blue today. And right now there is no snow on the ground, which only helps the disbelief that it could be December...
I have wanted to post this project for a few weeks now, but I only got it finished tonight, which is later than it should be! LOL! I found a really great idea HERE and absolutely loved it! I thought it would be tons of fun to do with the kids too. I wanted to surprise my husband with his (he knew about the kids getting this) and he just might choose to read this blog the day I announce a surprise for him...hee hee

So, here you have it, three Christmas Countdowns! (husband's hanging over our bed, kids' hanging near the front door. and now you know why it took me til tonight to complete it........LOL!)

Here it is, as a work in progress, plus a closeup on the stamped images. I tried to use a variety!
This project could have been made simpler with say, single-sided DP folded in half instead of stamped card stock notes, but this was the cheapest way I could think to make it. I used non-SU 12x12 card stock that came from random scrapbooking kits and who knows where, but it was stuff I wasn't intending to use in my scrapbooks, so that's handy. And with stamped images, I didn't use up other product! Then I bought the wide holiday ribbon and clothespins at walmart.
Some notes held a surprise such as a family activity for that day (special movie, drive to see the lights, baking treats, game night, etc), lots were little love notes full of praise and thanks. I think it will make for a fun December and keep the excitement of the holidays going!

Wednesday, November 16, 2011

MIA?

It isn't that I lack projects to share, its that I have about 960 commitments right now and hardly any time to blog and post them! Its that time of year, isn't it? I literally wrote out a map of my week just so I could keep track of everything and mark it off as I completed it. I actually have most of my Christmas Card Class projects still to share, since the first round of the class was this last weekend! I also have more calendar pages to share with you!
So, here are two cards that are similar and yet different. Colors and accessories make a difference! The first is more vintage and the second is more traditional/classic. I really like them both, which must be why they're sort of similar to last year's designs! LOL!

 and here's a detail shot to better see the fabulous new ribbon and buttons found in the Holiday Mini!
Supplies 1:
Stamps: Greeting Card Kids
Ink: Basic Black
Paper: Always Artichoke, Crumb Cake, Cherry Cobbler & Very Vanilla card stocks
Accessories: Watercolor Wonder Crayons, Blender Pens, Victoria Lace, Vintage Trinkets

Supplies 2:
Stamps: Greeting Card Kids
Ink: Basic Black
Paper: Real Red, Old Olive, Early Espresso, Whisper White
Accessories: Watercolor Wonder Crayons, Blender Pens, Holly Berry Buttons, Early Espresso quilted ribbon

Thursday, October 13, 2011

Back to Halloween...!

Do you send Halloween cards? I only sometimes do, and only to those who love them, lol! My grandmother, her sister and my mother love to send Halloween cards so I do try to have at least one go out to each of them. Mostly I like to scrapbook Halloween themes, because its more about fun memories with the kids, than crafting and sending notes.

Here is the second card using the embossing folder. I did it with Elegant Eggplant ink this time, and added this sweet little witch! I colored her mostly using ink pads and blender pens, but the skin was colored with the Blush Blossom watercolor wonder crayon.
Supplies:
Stamps: Greeting Card Kids, Teeny Tiny Wishes
Ink: Elegant Eggplant, Craft Basic Black, Wisteria Wonder, Wild Wasabi, More Mustard, Peach Parfait, Pumpkin Pie, Soft Suede, Daffodil Delight
Paper: Peach Parfait & Whisper White card stocks
Accessories: Blender Pens, Black grosgrain ribbon

Monday, January 10, 2011

Demo'd card

I had a workshop on Saturday and this is one of the cards I demo'd. I was able to show the Watercolor Wonder Crayons (which have got to be one of my favorite products), clear-mount stamps, and our fun rub-ons from the new Occasions Mini.
(sorry for the poor quality photo- its snowy!)
Supplies:
Stamps: Greeting Card Kids
Ink: basic Black
Paper: Pink Pirouette, Basic Gray, Whisper White
Accessories: Love Impressions rub-ons, Watercolor Wonder Crayons, Blender Pen

Wednesday, December 1, 2010

Christmas Sketch!

Its been a while! Did you have a nice Thanksgiving? We had a wonderful day and a long weekend. Now its time for the Christmas rush! I'm certainly not ready to mail out my Christmas cards so I took some time yesterday and played with this week's sketch from Jen's SSFYTT and made this:


Supplies:
Stamps: Greeting Card Kids, Come to Bethlehem
Ink: Always Artichoke, Basic Black
Paper: Very Vanilla, Cherry Cobbler, Deck the Halls DP
Accessories: Bitty Buttons, Blender Pens, Mini Glue Dots

Its similar to others I'm making this year, and I am loving the vintage look.

Anyway, hopefully with the need for Christmas cards, I'll be posting more again!

Friday, November 19, 2010

Sneak Peek 3

This is the end of the sneak peeks. This is my very favorite card for the year. I LOVE this sweet stamp set and I LOVE this elegant, traditional DP. Perfect, perfect.

One thing I'm doing a little different this year is offering more than one accessory option per card. I'm doing a stamp-a-stack which means people will take home four of this card design (and all six of them) but can choose to use this fabulous teeny button brad, or a teeny safety pin, and in three metallic colors. I think all of the cards will be like that. Choices, choices, but only on the accessory. *wink*

Supplies:
Stamps: Greeting Card Kids
Ink: Basic Black
Paper: Very Vanilla & Always Artichoke card stocks, Deck the Halls DP
Accessories: Victoria crochet lace, Vintage Trinkets, Blender Pens

Friday, October 22, 2010

Variations on Cards

In September I had 4 card events in a 15 day period. I am pretty sure that is a record for me and my little buisness! I loved it, but that meant I needed to use the same (or at least similar) ideas over and over. Some of these events were up in the air as far as attendance. That's a challenge in an of itself. I needed to provide 'enough' but not too many of each sample. Consequently, I have a nice stack of card kits ready to go!

While trying to tidy up my crafting space I decided to use those kits but differently than the original. Here's my first set! What do you think?

Original:

Variations:

Tuesday, October 12, 2010

School Page #3

I promise I have other photos to scrapbook, but this is what I have done. The good news is now there are three copies of the first day of school and it IS time to move past it, lol!


Supplies:
Stamps: Greeting Card Kids, Just Perfect Alphabet
Ink: Basic Black, Not Quite Navy
Paper: Newsprint DP, More Mustard & Whisper White card stocks
Accessories: Spiral Punch, Blender Pens, Watercolor Wonder Crayons

Monday, October 11, 2010

a bit of October

I forgot to schedule any posts over the weekend! Here is another card that uses a sketch for World Card Making Day. I kept it very simple...

Supplies:
Stamps: Greeting Card Kids, Teeny Tiny Wishes
Ink: Basic Black
Paper: Pumpkin Pie, Elegant Eggplant, Whisper White card stocks
Accessories: Watercolor Crayons, Blender Pens, Wide Oval Punch, Black grosgrain ribbon


I don't have too many people to send Halloween cards to, usually I just do a lot of October pages. But I really love this Greeting Card Kids set and had to play with this image too!

Wednesday, September 22, 2010

Scrapping School!

Its funny that even knowing I have like a decade worth of photos to scrap, and how very daunting the idea is, it is *so satisfying* to scrapbook current events!!! Half of the point of scrapbooking is to have fun and enjoy these memories. I am having fun catching up on the excitement of September 2010. So that is what I am doing in the little spare time I can find! Yeay! These pages are nearly identical, and were for my September scrapbook class. I wanted to use this adorable pair of school children on a back-to-school page, and I also thought this map DP was perfect for a school theme. I'm just undecided on how to go about a title. And I thought I'd share them un-titled, since you need something new to look at!
Supplies:
Stamps: Greeting Card Kids
Ink: Basic Black
Paper: Daffodil Delight, Old Olive, Real Red, Whisper White card stocks, Newsprint DP
Accessories: Watercolor Wonder Crayons, Blender Pens, Bold Bright button assortment

Monday, September 6, 2010

Thank You x 3

Happy Labor Day! What are we celebrating exactly? That my husband and children are home? Oh good. We could use a little down-time.

Anyway, I was in need of a few thank you cards. Okay a lot. And I ran out of my whole stash! So I pulled up some go-to sketch sites and created these!

This card is based off of Mojo Monday #154. I left off a few edges and the corner bit, but its close. Supplies:

Stamps: Thoughts & Prayers, Occasional Quotes
Ink: Always Artichoke, So Saffron
Paper: So Saffron, Perfect Plum, Always Artichoke, Whisper white card stocks
Accessories: Artichoke seam binding ribbon, Scallop Circle Punch, 1 3/8 in circle punch, Scallop edge punch

~~~~~

This card used Jen's SSFYTT for this week, and this seriously sweet new set. Goodness I love it. I have so many plans for it! tee hee!

Supplies:

Stamps: Greeting Card Kids, Tart & Tangy
Ink: Basic Black, Real Red, Certainly Celery
Paper: Real Red, Certainly Celery & Whisper White card stocks
Accessories: White Grosgrain Ribbon, Real Red grosgrain ribbon, Bold Brights Buttons, watercolor Wonder Crayons, Blender Pens

~~~~~

and this card uses the OCC Sketch Challenge. The problem? Um...I love this one a leeeetle too much. I can't part with it quite yet and it is going on my display board. Now I gotta make another thank-you card!

Supplies:

Stamps: Uncharted Territory
Ink: Basic Black, So Saffron, Night of Navy
Paper: Whisper White & Night of Navy card stocks, In Color Patterned Paper Pack
Accessories: Watercolor Crayons, Blender Pens, Sponges, White grosgrain ribbon

~~~~~

tip for the day: I don't yet have the circle cutter. So how do I make circles? stamp the image you want in the circle and set a button case lid or ribbon spool on top of it, then trace and cut your circle!

Related Posts Plugin for WordPress, Blogger...