Friday, June 27, 2014

Week 25!

I feel like I'm behind in posting weekly pages here...maybe I am, I'll have to go back and look, haha. I'm just a little behind in the creating of weekly pages, but am doing pretty good staying on top of it. Last night I got this one done, so here you go!
Again I used a sketch from Pinterest, which you can see HERE. Also, you see the bit of "washi tape" holding the photos on the page? That's a fun trick...here's how it works in MDS- you make a photo box the size you want, fill it will DP, and tear the two sides! I also changed the opacity to make it look more like tape.
I told you I'm having more fun with this! *smile And you know, if you're interested in giving it a try, there is a FREE 30 day trial of MDS you can play with!
Supplies:
MDS: SAB14 content (DP & Twine), Sara's Sequin's download, Recolor tool (button), Days To Remember content (label) 

Thursday, June 26, 2014

Father's Day Page

I've been getting rather a lot of digi scrapping done lately. I'm excited about that...but it means I've got to send a lot of pages off for printing! (I haven't printed any pages during 2014...gulp!)
Here is the page I made about Father's Day this year. I am loving this frame download! I also liked that the photos fit so nicely in the squares, haha! I used another sketch I found on Pinterest, which you can find HERE.
Supplies:
MDS: Lemonade Stand content disk (honeycomb overlay), Days to Remember content disk (background paper, stitching), Candid Frames download

Wednesday, June 25, 2014

My Paper Pumpkin - June!

So here's what I made with My Paper Pumpkin at my workshops on Friday!
At the earlier event, I started making this cute banner! I have a "window" cut out between my kitchen and dining room, and that was the perfect spot to hang it!
....funny that the masking tape shows up so boldly in the photos...my walls are exactly the color of masking tape so it doesn't show up at all in real life...

and then later, I made up the three different pinwheels, and stuck them in a jar with some clear marbles for a little centerpiece! Oh, I also added a bit of Soft Sky seam binding ribbon.
Honestly, I really like the idea of using the pinwheel in place of a gift bow on a small package. I think that's a really fun, different idea.

Keep watching my blog and facebook events for more info about my Paper Pumpkin class!
Also, go check out my newest board on Pinterest, dedicated to My Paper Pumpkin kits!

Tuesday, June 24, 2014

My Paper Pumpkin - The "why"

Confession: When Stampin' Up! released the My Paper Pumpkin concept, I blew it off. It didn't appeal to me and I didn't think it would appeal to my customers. I saw a few projects online and thought they were cute, but meh... We all have our own tastes and I haven't met anyone who can't find plenty in the catalog to order, haha. Sooo I didn't really advertise it. I added the button to my blog and left it at that.

Truth or Dare....TRUTH: I am participating in a training provided by Stampin' Up! this month, to use My Paper Pumpkin to build our businesses. I signed up to receive the kit and I gotta say, my opinion has done a complete 180*! I've received the June kit, I am bursting with ideas, and I'm super excited that now that I am a subscriber, I can even purchase complete or part past kits!

What does this mean for you?
Well first of all, if you missed my workshop last Friday, you missed out on a fun alternate idea for June's kit, which actually came straight from Stampin' Up! (see it tomorrow, here!)
But also, in July, I am holding a class where we will use nothing but My Paper Pumpkin supplies and create several different things.
And, I'm going to be having a lot of fun with the kits and I hope you'll join me!

Who would enjoy subscribing to My Paper Pumpkin?
  • People who like surprises! Each month is something new and different! The stamps included in My Paper Pumpkin are not the same stamps you can order. They are exclusive to each month's kit, and if you don't like to miss out on exclusives, this is for you! 
  • Busy people who still want {or need!} crafting time! These projects are meant to be quick, giving you a 30 min or less time frame to make something fun! Nap time? After the kids are in bed? Yep! The thinking and gathering is done for you, all you have to do is put it together! 
  • Not-busy people! Do you know anyone on maternity bed rest or down for any other reason that could use something pretty to make? Yep, this is for them! 
  • Beginning stampers! As I said, the kit is already put together, and it comes with instructions. All you need is adhesive and scissors, and you're set! 
  • Advanced stampers! These kits are perfect for getting your mojo back from those slumps we find ourselves in. No thinking required- just assemble! Or! Change it up with what you already have and make the projects your own! 
  • Someone without the space to dedicate to craft supplies! Each kit comes with a small photopolymer stamp set and a Stampin' Spot (or two!). Neither take up much space, and once you use or give away the cards or project, you can store several stamp sets and inks in one box! And since all you need is scissors and adhesive, that can even fit in the box too! (The box is only approximately 6"x9" so you can see how little space it will take!) 
  • Someone who wants to build up their stamp supplies without a lot of cash. Again, you get stamps and inks to keep forever- and Stampin' Up! has promised to not duplicate the same ink color in a year. That's at least 12 different colors of ink, coming right to your door! For only $19.95/month this is a great solution! (shipping is included in the cost!)
  • And if you end up not liking one of the kits- it makes a perfect gift- already wrapped up ready to go!!! 
  • Bonus Tip: Did you know that you can order My Paper Pumpkin as a gift for someone else? You can gift a one time, three month, six month or 12 month subscription to anyone in the United States! (or Canada if you live in Canada) Like whom, you may ask? Read above! How about a busy mom who doesn't seem to get to be crafty anymore? How about someone on bed rest or in bed with a long term sickness? How about your sister or mom or best friend or anyone YOU would want to get together with for a craft night?! 
Enough chatter! Let's get down to it! Here's my June kit, as I opened it, taking photos just for you! *grin
What do you think?
Do you want to give it a try?
Well, if you aren't yet convinced, come to my class in July and see what you think then! *grin

Monday, June 23, 2014

Workshop Make & Take

To those still wanting to place an order with my workshop Friday, I'm holding it open until Thursday. You can get your check and order to me before then, or! You can place an order online, using me as your demonstrator, and the Hostess Code 29RUCAJG. That's a great option if you want to order any downloads for MDS, or simply live too far away from me and want it shipped directly to yourself. *grin

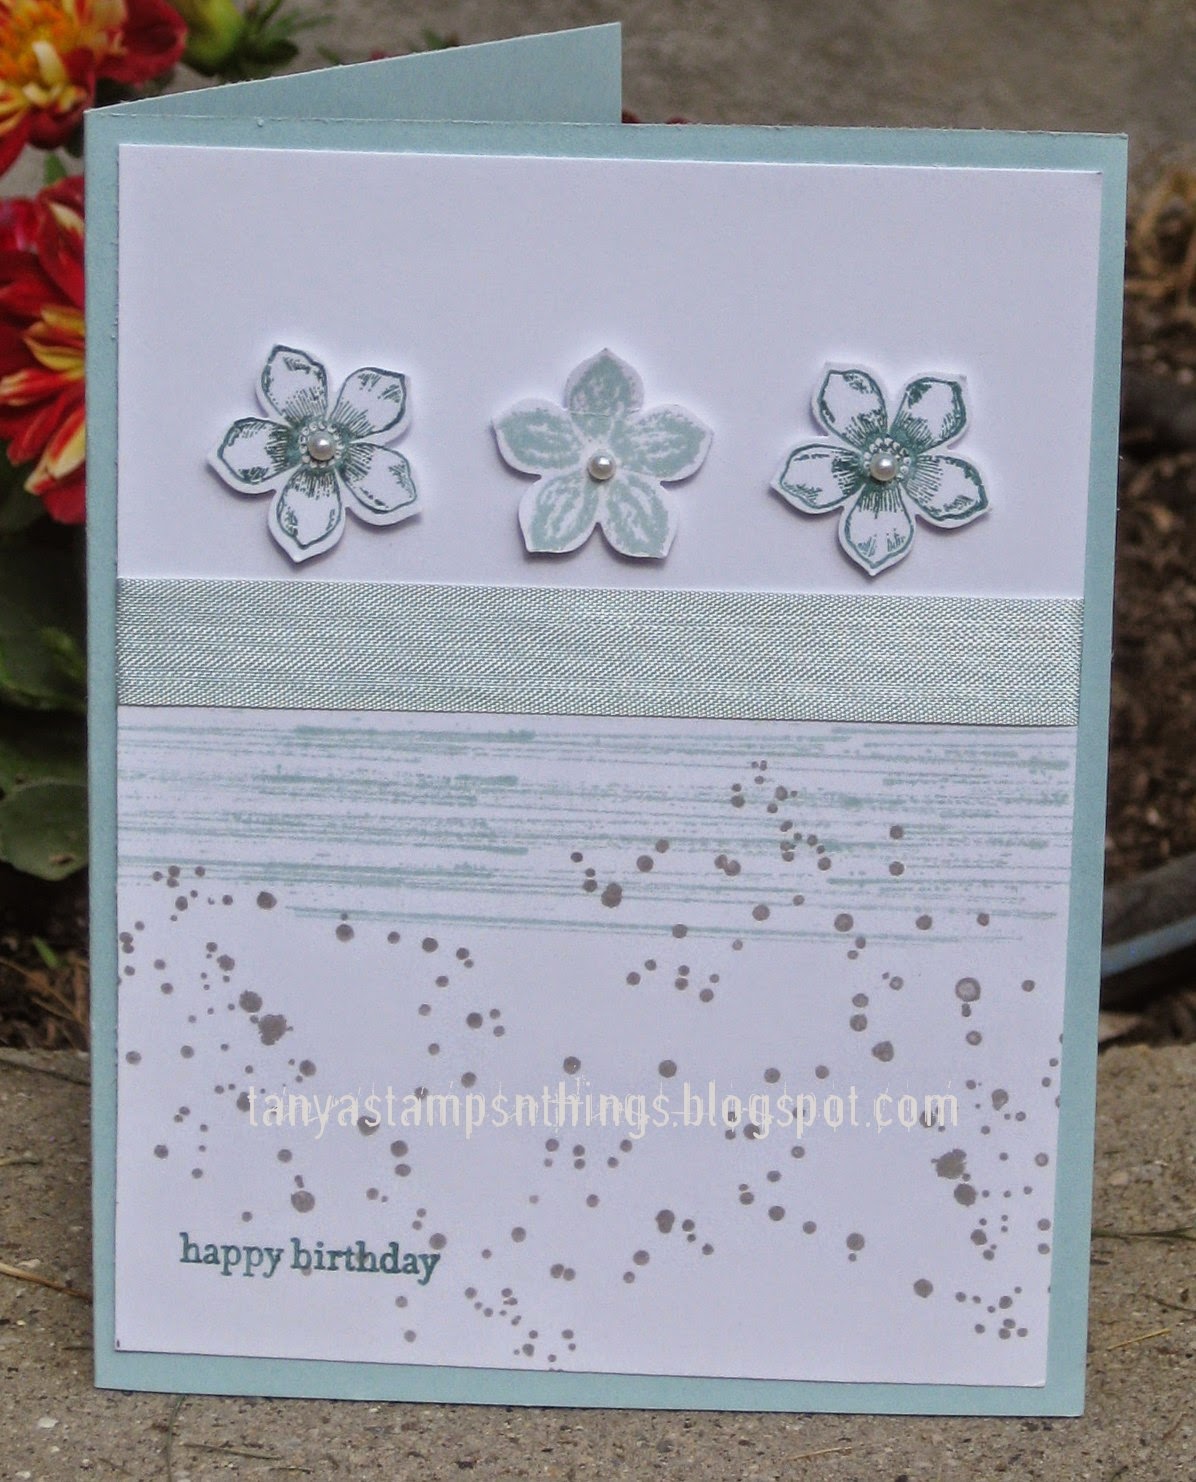
This sweet card is what we did for the Make & Take Friday.
I based the card on the Retro Sketch #118.
I don't usually use so many stamps in a Make & Take- I don't want new people to feel overwhelmed and like they "haaave to buy allll this stuff to make one card" because they definitely don't. But I wanted to feature a punch and stamp set that coordinates, and that meant I needed words. And I like how Gorgeous Grunge just adds personality to a card!
And, the people who I expected to come are familiar enough with my stamping style to know they don't haaave to use so many stamp sets on one card, haha...
Supplies:
Stamps: Petite Petals, Gorgeous Grunge, Teeny Tiny Wishes
Ink: Soft Sky, Lost Lagoon, Smoky Slate
Paper: Soft Sky & Whisper White card stocks
Accessories: Soft Sky seam binding, Pearls, Petite Petals punch, Dimensionals

Friday, June 20, 2014

Thousand Thanks

Today is the day!! Will I see you here? *grin

Here is another card to fill up my board. I would have liked the sketch better with some DP but I don't have any from the new catalog yet! That meant I had to make my own! *grin I embossed the bottom layer and stamped the Mossy Meadow layer - works well enough!
For this card I used the Viva la Verve second June sketch.
Supplies:
Stamps: Truly Grateful, Lots of Thanks
Ink: Early Espresso
Paper: Mossy Meadow, Hello Honey, Lost Lagoon, Very Vanilla card stocks
Accessories: Big Shot, Arrows Embossing Folder, Hexagon Punch (for flagged ends)

Thursday, June 19, 2014

Happy Butterflies!

Tomorrow is my New Catalog workshop! Don't forget to RSVP so that I can have your supplies prepped! In the meantime, I am still getting everything ready!

Today I have another card from my display board. For this one, I used the current Clean & Simple sketch, and another color combo from MDS. It is definitely clean and simple!
Supplies:
Stamps: Papillon Potpourri, Itty Bitty Banners
Ink: Rich Razzleberry, Daffodil Delight, Old Olive
Paper: Old Olive, Sahara Sand, Whisper White card stocks
Accessories: Bitty Butterfly Punch

Wednesday, June 18, 2014

Pink Flowers

I've got my New Catalog Workshop this Friday {are you coming?!} so I am trying to finish filling my display board before then! Super handy that Tuesday was cold and rainy! (it's been in the 90's lately and Tuesday it stayed in the 60's) I decided to pull out any stamp sets that are used less than twice on the board already, haha. I thought that was a good way to show some variety!
The first card I made this round used the Nacho Average sketch that I am late for...ahem...
Supplies:
Stamps: Petite Petals, Lots of Thanks, Gorgeous Grunge
Ink: Blushing Bride, Basic Gray, Smoky Slate
Paper: Pink Pirouette, Blushing Bridge, Pool Party
Accessories: Epic Day Washi Tape, Petite Petals Punch, Big Shot, Chevron Embossing Folder, Rhinestones

Tuesday, June 17, 2014

GNO Page

My other favorite thing about digital scrapping is that I can do a page in less time than it takes to get photos developed! These pictures were taken this weekend! Looove that!
Once again I used a sketch from Pinterest (found HERE), and I also used a challenge from SCS to use 'scraps'. In order to make it look like scraps, I cropped the things like the twine, and I used the tearing edge on the DP. Can you tell on this copy?
Supplies:
MDS:
Stamps: Always, Bloomin' Marvelous, Certified
Happy Hello download, Lemonade Stand content disk, Splatter Tool, Recolor Tool

Monday, June 16, 2014

CASE from the Catalog!

I'm still familiarizing myself with the brand new catalog, how about you? *grin 
The other day as I was perusing I decided I was in love with the card found in the lower corner on page 153. I have the stamp set they used, so I sat down and made it! My version is different, of course, and has lots more layers than my usual creations. But I really like how it turned out!
Supplies:
Stamps: Truly Grateful, Hardwood
Ink: Crumb Cake, Hello Honey, Early Espresso
Paper: Hello Honey, Very Vanilla & Mossy Meadow card stocks
Accessories: Natural Chevron Ribbon, Honeycomb embossing folder, Autumn Accents die, Big Shot, Neutral Buttons, Staple

So first I embossed the big bottom layer. Then I dragged my Crumb Cake ink pad over it to grunge it up and give it a little more definition. Next I used Early Espresso to stamp the Hardwood stamp on the strip of Hello Honey. I stamped the wood grain image from Truly Grateful, and die cut the oak leaf with it. I die cut the big maple leaf and crumpled it and scuffed it with Early Espresso too. The greeting is stamped in Crumb Cake, and I used a tiny strip of Hello Honey in the button. Fun huh?

Saturday, June 14, 2014

New Catalog Workshop scheduled!

I have {finally!} set the date for my New Catalog workshop!
Please RSVP by the 19th to have your make & take supplies prepped!
Come have some fun checking out the brand new catalog, creating a cute make & take and chatting with the girls! 
1-3 pm or 630-830 pm(same event, two time slots for your convenience!) 
- Pick up a copy of the new catalog for only $3! 
- Purchase some of my retired stamps for 50% off! 
- I'll demonstrate two different projects and you'll get to make the third! 
- Yummy treats provided!

Friday, June 13, 2014

Flowers & Hardwood

Two of my favorite carry-over items, from the Occasions Mini, are the Petite Petals stamps and punch, and the Hardwood background stamp! For this card, I combined them, along with a recent Freshly Made Sketch.
Supplies:
Stamps: Petite Petals, Hardwood
Ink: Crumb Cake, Strawberry Slush, Crisp Cantaloupe
Paper: Pear Pizzazz, Very Vanilla card stocks
Accessories: Natural Chevron Ribbon (the back side), Corner Rounder punch, Petite Petals Punch, Dimensionals, Staples
Related Posts Plugin for WordPress, Blogger...